If you are thinking of camperizing a van you should know that, depending on its size, the type of use you will give it and your needs, it is likely that a significant part of your budget will go to the electrical installation. It is also one of the stages that requires the most planning and study … But don’t worry, with a little effort, our tutorials and a lot of patience 😅 you will be able to do the electrical installation in your camper! It is not as difficult as it may seem ✌️
Installation planning: Assess your needs and calculate your theoretical consumption
Especially at the beginning of projects we tend to be excited and impatient, wanting to get down to work and start enjoying the results as soon as possible. But there are stages that require us to hit the brakes a bit and stop to think and plan each step carefully . One of these stages is the electrical installation.
At this point you should already be clear about what type of use you plan to give your van: if you want it to go out on weekends, if you will use it for vacation periods or if you will live in it, as is our case. Bearing this in mind, the first step you should do now is to carry out a study of the devices with electrical consumption that you plan to use in your van and how much use you will give each of them. In this way you will be able to estimate , approximately, the components that will allow you to have electricity in the camper.
Answer these questions to help you with the planning of the electrical installation
Appliances with electrical consumption
Think carefully about all the consumption you may have in order to later make a theoretical calculation of your total daily consumption.
- How many LED lights will I put?
- Will I have an electric fridge?
- Water Pump?
- Resistors for deposits?
- TV?
- Charge the mobile, the laptop, the camera?
- Investor?
- Microwave?
- Do I want to bring my hair dryer?
- What consumption does each of them have?
Auxiliary battery
- What type of battery will I install? Gel? AGM? Lithium?
- How many days of autonomy do I want to have?
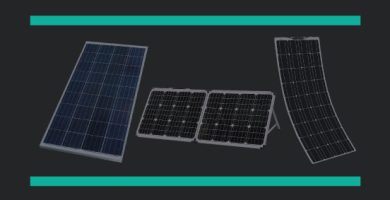
Solar panel
- Do I need or want to install a solar panel?
- Will the panel be fixed or portable?
- Rigid or flexible?
- Monocrystalline or polycrystalline?
- How much free space do I have on the roof?
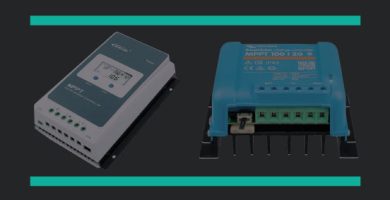
Solar controller
- MPPT or PWM regulator?
- With or without DC output?
Investor
- Do I want to have 220V in the van?
- How much power is the 220V device with the most consumption that I am going to use?
- Will I have fixed 220V plugs?
- Do I mind having to get an electrical bulletin and homologate?
Electric consumption calculator for camper van
Ufffff, what a mess… Above all, don’t get overwhelmed! 😅 . To make this whole process a little simpler, at MejoraEnFurgoCamper we wanted to lend you a hand by putting at your disposal a wonderful campervan consumption calculator that will allow you to calculate your theoretical electricity consumption in order to correctly size the components of your installation so that you don’t fall short! of energy!
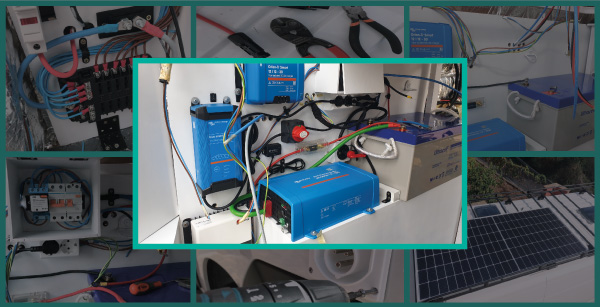
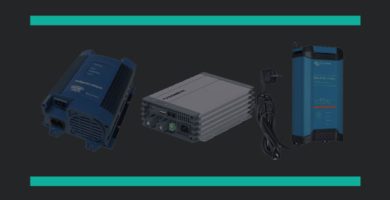
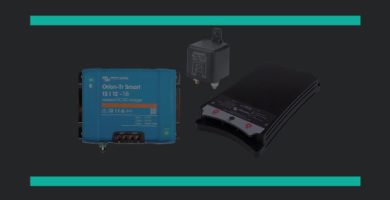
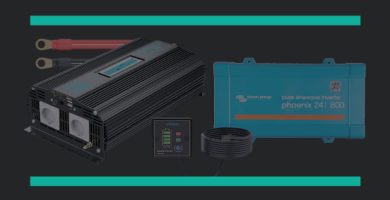
What electrical components will make up the electrical installation of your camper?
When you are clear about your consumption and your needs, the time will come to choose the electrical components that you will install in your van. Within each element there are several types of technologies, capacities, powers, sizes… Select the ones that best meet your needs and fit your budget . If you are still not sure which model of each element you are going to buy, we have created some posts with a lot of information that we believe will help you solve many of your doubts.

How to design the electrical diagram of a camper van?
Once you have chosen all the elements that you are going to install in your camper van, you will have to design the electrical diagram of the installation . If you don’t have some experience with electricity this may sound a bit silly, but it’s a must when it comes time to start installing and checking that everything is connected as it should be.
Below we leave you the diagram that we made during the planning of the electrical installation of our van, in case it inspires you 😉 If you do not have much idea about electricity, study the circuit carefully and try to understand it , then apply it to your particular use case and adapt it to your needs.
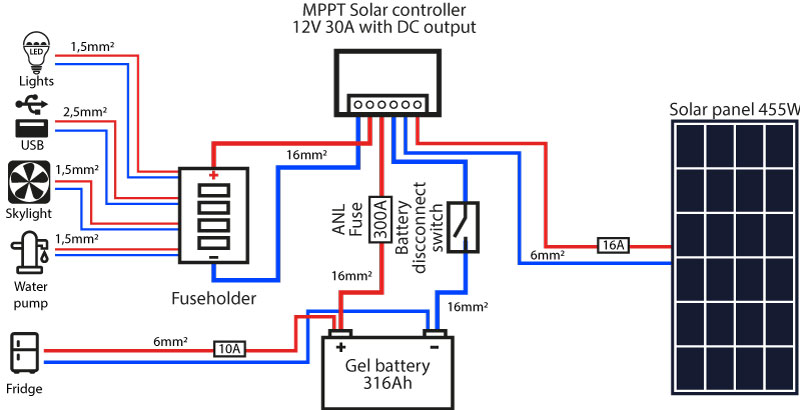
Remember that each installation is different and that you must design yours and dimension it in a way adapted to your needs. If you don’t have much idea how to do it, keep reading, don’t skip any step and, if you need it, ask qualified professionals for advice.
Electrical installation step by step
To try to make it a little easier to understand each element that makes up the electrical installation, we wanted to divide it into four parts. It was less confusing for us to do it this way and we hope it makes things a little easier for you too.


Do you know how to calculate the section of each cable in your installation?
First of all we are going to remember that the «thickness» of a cable is specified by its section and not by its diameter. So, to correctly size your electrical installation, you should calculate the minimum section that the cable with which you will connect each of your devices or consumables must have.
There are different ways, standards and criteria to take into account to size the cables. Below we leave you a calculator with which you can do the calculations, taking into account many variables, but, if you want to know more, read our post on how to correctly calculate the minimum section that a cable should have, to see if we can clarify some of them. your doubts.
If what you want is a quick table that shows you a very general idea of the minimum section that can be used depending on the electrical device to be connected, here is one that can serve as a first guide:
| Sección de cable | Dispositivo eléctrico |
|---|---|
| 1,5 mm2 | Lightning |
| 2,5 mm2 | Plugs, water pump |
| 6 mm2 | Fridge* |
| 25 mm2 | Batteries** |
* Many people connect the fridge with a 2.5mm2. After reading in forums and asking people who understand the subject, we prefer to install and recommend a 6mm2 cable to reduce voltage drop and heating risks.
** We put a cable with a 16 mm2 section since it is the maximum section that the Orion TR-Smart converter accepts. Due to this, we believe that putting 16 mm2 should be more than enough, but our idea and recommendation is to put 25 mm2 cable.
Keep in mind that the thickness of the cable will have to be directly proportional to the consumption of the device and the length of the cable, so the higher the consumption and the longer the cable, the larger the section you should use.
What fuses should be installed and how to calculate their size?
As a general rule, the fuses that are installed externally in an electrical installation, not inside a device, are placed to protect the cable in which it is installed, therefore they must be dimensioned taking into account the section of the cable and the amperage maximum supported by it.
Another piece of information that you can take into account is the consumption that the device connected to said cable will have. To give an exaggerated example:
If you have a 6mm2 cable, which can withstand about 35-40A to which a device with a 3A consumption will be connected and which already has a built-in interchangeable fuse (this is important), it may not make sense to put a 30A fuse , it is possible that one of 10A is more than enough.
As we have already said several times, it is very important that you analyze your particular case and also apply a bit of logic and common sense. Not everything has to be exactly as the theory dictates
Always make sure to pay close attention and take all possible precautions and safety measures. Regarding electricity, keep in mind that:
- Electricity at a low voltage (12V, 24V, etc.) is safe on a personal level, but its intensity is very high.
- At higher voltage (220V) it is not safe on a personal level, but its intensity is low and easily controllable.
Power drop by cable length and section
One point to take into account when calculating the section of a cable is the power drop. In a very simplified way: Even the best electrical conductor opposes a little resistance to the flow of current, so as it progresses through the cable, its voltage will drop. To solve this problem and minimize the power drop, a cable with a larger section must be installed, so that the resistance to the passage of electricity is les
There are devices, especially electronic ones, that are very sensitive to voltage and if the cable that connects it is too long or undersized, there may be a voltage drop greater than the admissible one, causing it to stop working properly.
This is why, paying attention to the recommendations they gave us, we recommend putting 6 mm2 cable to the refrigerators, it seems that they are very sensitive to voltage drops.
Each electrical installation is different. Our intention, when writing this post, is to explain a little how we calculate and size our electrical installation so that you can apply the general concepts to your particular installation.
When we started with electricity we came to the conclusion that it was not so complicated to do it ourselves. We believe that making a functional and safe installation in a van (which is a small and simple installation) is within the reach of anyone who puts a little interest and care. What do you think? If you don’t know something or have any questions, seek advice and ask for help… In the campervan world, people are very supportive and there will always be someone who will be happy to help you.