
If you’ve taken the plunge to build your own camper without having much idea of what you’re doing, you may have been hinted on occasion that you’re out of your mind… Don’t worry! It’s happened to many of us… 😅 So to make the process a little easier, and not go completely crazy 🤣, we leave you our step by step guide on how to do the installation of the auxiliary battery Are you ready?
Si te has lanzado a construirte tu propia camper sin tener mucha idea de lo que estás haciendo puede que te hayan insinuado en alguna ocasión que estás mal de la cabeza… ¡No te preocupes! A muchos nos ha pasado… 😅 Así que para hacerte el proceso un poco más sencillo, y que no te vuelvas loco del todo 🤣, te dejamos nuestra guía paso a paso sobre cómo hacer la instalación de la batería auxiliar ¿Estás preparado?
1. Assess your needs and calculate your theoretical consumptions
This is the first step of any installation. To be able to know what components we have to buy, we must have an idea of what average consumptions we are going to have and what dimensions our electrical components will have. If you are still not clear about these questions, use our electrical consumption calculator for camper vans to size your installation.
2. What type of battery to choose?
At this step you should already know what size battery you need, but what type? If you haven’t decided on a battery type yet, you might be interested to know what is the best auxiliary battery for a camper van? You can read our post and come back here when you have decided.
3. How to charge the auxiliary battery with the alternator or the main battery?
As camper or campervan users we know that we must make the most of all the resources we have at our disposal, so we can not miss the opportunity to recharge our auxiliary battery while we are on the move, taking advantage of the main battery and the alternator of the vehicle using a battery separator relay, a converter or booster. If you want to know more about other ways of recharging, you can read our post on how to recharge the auxiliary battery in a motorhome or camper.
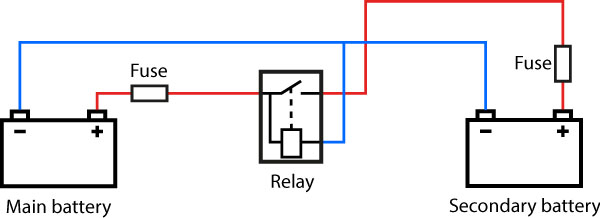
Battery separator relay
This system basically consists of the installation of a charge separator relay between the two batteries. In case you do not know it, a relay is an electrical component that works in a similar way to a normal switch. The difference is that an electrical signal will be in charge of its activation or deactivation.
The operation of this system is very simple. When the engine is on, the alternator is in charge of recharging the main battery of the vehicle, what we must do is to connect the batteries by means of the relay, so that, only when the engine is on, the auxiliary battery is also recharged.
Non-automatic or “manual” battery separator relay
If you decide for a non-automatic relay, you should know that it can be connected and operated in different ways, including the following:
Manual connection by means of a switch: With this option you would have to insert a switch between the relay drive pin and a 12V source, so that it is activated by the switch when the vehicle is on.
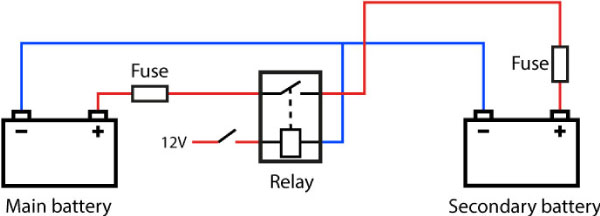
Thanks to the installation of the switch, you could make sure to disconnect the relay before turning off the vehicle, as a safety measure, or if you are driving and your auxiliary battery is already charged.
Connection of the relay to the +D terminal of the alternator: You can also connect it to the alternator, so that it is activated when the alternator is running, i.e. with the engine started.
You could intercalate a switch between the relay and the alternator to have more control over the charging process.
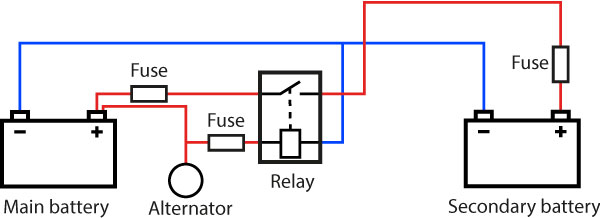
Automatic battery separator relay
An automatic battery separator relay will automatically switch on or off when it detects that the main battery has reached a preset voltage, i.e. when it is charging and has reached the set charge level or is charged. It will in turn disconnect when the voltage drops below the float level as it will mean that the battery is discharging below that level. An advantage of automatic relays is that they can charge in both directions, i.e. they can charge the main battery from the secondary battery and vice versa.
It is highly advisable to install a switch to disconnect the relay when the vehicle is turned off or in case of detecting that the relay is not working properly, as the relay may take a while to turn on even after the vehicle is turned off, which may jeopardize the charge level of the main battery if the van is consuming electricity.
Although the relay, whether automatic or not, is the most used way among camper van users, due to its low cost, it is not the best option. The charging current sent by the alternator has variable voltages that are not adjusted during the different phases of battery charging, therefore the lifetime of the auxiliary battery could be affected by charging in a non-optimal way.
Converter or booster
Basically both a DC-DC converter and a DC-DC buck-boost converter or simply a booster are used to optimally charge the auxiliary battery. They are programmable and usually include step-charge algorithms that adapt to the type of battery and the discharge level of the battery, adjusting the output current voltage to a suitable value at all times. This extends the life of the battery.
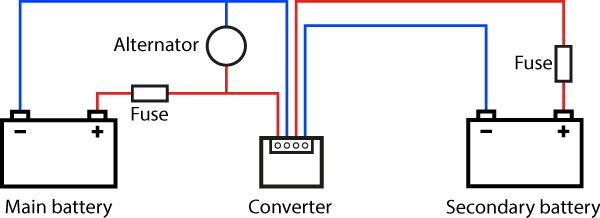
For us, installing a converter or booster is the best option. We know that they are much more expensive than a relay but, if with a converter you get optimized recharges that extend the life of your battery, we believe that in the end it pays off. So our advice is that, if it is not within your budget, try to save that money on other things that are less important.
4. Cable cross-section calculation
This section is very important, since if the cables that you use in your installation are of a section inferior to the suitable one, the temperature of the cable will increase over the safety limit, which will cause that the risk of fire increases for overheating and degradation of the protective material.
Many battery and relay mounting kits sold in camper stores include 10 mm2 cables to connect the batteries. After making our calculations and consulting with professionals we decided to install 25mm2 cables to connect the batteries but, at the time of installation, we realized that the maximum section accepted by our Orion Tr-Smart 12|12 30A converter (see on Amazon) is 16mm2.
If you are not sure how to calculate the minimum section of a cable in the electrical installation of a camper, read our article and get out of doubts!
Our recommendation is to use, in general, 25mm2 cross-section cables to connect the batteries together.
5. Make sure you have all the necessary components and material
More than once it has happened to us, and it will continue to happen 😒, that we are in the middle of an installation and we realize that we have forgotten to buy some nonsense without which we can not move forward… Who has not happened to you? Here is the list of the material we use, to help you:
Auxiliary battery installation material
- Gel battery 12V 316Ah Ultracell UCG-316-12 ✓
- Orion-Tr Smart 12/12 30A (see on Amazon) ✓
- Cable 25mm2 (see on Amazon) ✓
- X2 Fuse 60A (see on Amazon) ✓
- X2 Fuse holder (see on Amazon) ✓
- Wire stripper pliers (see on Amazon) ✓
- Fish tape (see on Amazon) ✓
- Digital multimeter (see on Amazon) ✓
- Wire Connectors Kit (see on Amazon) ✓
- Heat Shrink Tubing (see on Amazon) ✓
- Soldering Iron Kit(see on Amazon) ✓
- Automotive or reinforced corrugated tubing ✓
Step by step of the installation of the auxiliary battery in a camper
1. Placing the corrugated tubes
Place and fix the corrugated tubes (see on Amazon) that you need. Keep in mind that the battery cables are quite thick, so you will probably need one tube for the positive and one for the negative.
Due to the thickness of the battery cables, it may be easier to pass the cables through the corrugated tube before installing it.
2. Wires
Pass the cables through the tubes with the help of a cable guide (see on Amazon) and label them at each end so you know how you will have to connect them later.
Remember that each cable must have the appropriate section both for the consumption that you will connect and for the length of the cable. In our case, we used 16mm2 cable to connect the batteries because it is the maximum section that accepts the converter but, if you can, use 25mm2 cable to avoid overheating.
3. Fix the battery to the chassis!
In all the projects that we do we must always have a lot of common sense and try to install each element in the safest way that we can. The batteries of certain capacity have a considerable weight, so it is necessary to hold them in a way that, before a braking or accident, it cannot be thrown out, being able to cause more damages or to worsen the situation. That is why we believe that the best way to do it is to anchor it to the chassis by means of some type of suitable fastening.
As our battery weighs 73 kilos! we decided to fasten it to the chassis of the van by means of 4 of the load fastening rings that the van came with. We made 4 holes to the chassis, 2 to the floor and 2 to a lateral rib, we put threaded rivets and the fastening rings and we fastened it with two load straps.
4. Fix the relay, the converter or the booster
To keep all the electrical components as tidy as possible, we fix each of the components we use to a side wall of the garage. Plan in advance which position each one will occupy, respecting the safety distances that must be maintained between them and that will be specified in the manuals of each component. At this point you will have to fix the device that you have chosen to charge your auxiliary battery from the main battery or the alternator of your vehicle (the relay, the converter or the booster).
In our case, the Orion Tr-Smart must be installed vertically on a non-flammable surface, with the connection terminals facing downwards, with a minimum of 10 cm separation from other devices, both below and above, and must never be placed directly above the battery.
5. Terminals for connecting the cables
Attach the necessary terminals to the wires. To do this you can use a pair of wire strippers that can also be used to crimp the eye terminals.
6. Connect the cables
Connect the cables according to the wiring diagram of your installation. This diagram will be different depending on the device you have selected to charge the auxiliary battery. We did it in the following way, following the instructions of the manufacturer’s manual:
- We disconnected the remote on/off, removing the jumper between the L-H pins.
- We connected a 16mm2 cable from the positive terminal of the main battery to the positive INPUT of the Orion Tr-Smart converter with a 50A fuse near the battery.
- We connect a 16mm2 cable from the negative terminal of the main battery to the negative INPUT of the Orion Tr-Smart.
- We open the VictronConnect application on the cell phone and configure the device. We have to select the charging algorithm suitable for the type of auxiliary battery we want to charge.
- We connect a 16mm2 cable from the positive OUTPUT of the Orion Tr-Smart to the positive of the auxiliary battery with a 50A fuse near the battery.
- Connect a 16mm2 cable from the negative OUTPUT of the Orion Tr-Smart to the negative of the auxiliary battery.
- Connect a switch between pins L-H to remotely drive the Orion Tr-Smart.
- Flip the switch to begin operation.
Battery bank, series or parallel connection?
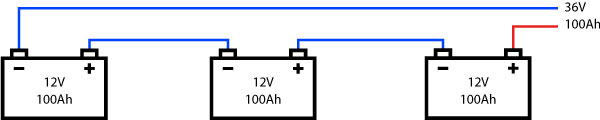
The best option is to install a single auxiliary battery working at the required voltage and capacity. Sometimes, for one reason or another, this ideal option is not possible and it is necessary to install several batteries together. So, should this be done in series or in parallel?
If several batteries are connected in series, their voltages are added and the intensity remains equal to that of the battery of smaller capacity.
On the other hand, if several batteries are connected in parallel, their capacities are added and the voltage is maintained.
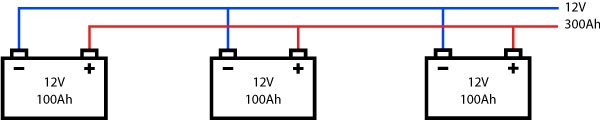
With this in mind, the easy answer would then be that it is almost always advisable to install them in parallel. The problem is that often the theory cannot be perfectly applied in practice and, in this case, connecting two batteries in parallel will seriously endanger both your batteries, drastically accelerating their aging, and your van, increasing the risk of overheating that could lead to a fire.
If you need to connect several batteries in this way, we recommend that you read our article “Connecting batteries in parallel more safely“. In it we talk about the risks involved and some tips that could help minimize them, we hope you find it helpful.
If there is any concept that is not very familiar to you, visit our camper electricity dictionary and solve your doubts.
Approximate budget for installing an auxiliary battery
→ 451.72 $ ✓ ✓
→ 232.32 $ ✓ ✓
Cables 25mm2 → 5.96 $/m ✓
X2 Fuses 60A → 6.10 $ ✓
X2 Fuse holders → 24.76 $ 24,76 $ ✓ X2 Fuse holders → 24.76 $ ✓
Wire stripping pliers → 15.99 $ ✓
Cable grommets → 4.99 $ ✓
Digital multimeter → 15.99 $ 15.99 ✓ ✓
X2 Eye Terminal – Cable 25mm, eye 10mm → 3.88 $ ✓ ✓
Heat shrink tubing for wires → 8.99 $ ✓ ✓
Tin soldering iron kit → 23.99 $ ✓
Reinforced corrugated tubing 16mm 25m→
AUXILIARY BATTERY INSTALLATION
| PRECIO | |
|---|---|
| Ultracell UCG-320-12 12V 316Ah GEL battery → | 451.72 $ ✓ |
| Converter Victron Orion Tr-Smart 12|12-30A → | 232.32 $ ✓ |
| Cables 25mm2 → | 5.96 $/m ✓ |
| X2 Fuses 60A → | 6.10 $ ✓ |
| X2 Fuse holders → | 24.76 $ ✓ |
| Wire stripping pliers → | 15.99 $ ✓ |
| Cable grommets → | 4.99 $ ✓ |
| Digital multimeter → | 15.99 $ ✓ |
| X2 Eye Terminal – Cable 25mm, eye 10mm → | 3.88 $ ✓ |
| Heat shrink tubing for wires → | 8.99 $ ✓ |
| Tin soldering iron kit → | 23.99 $ ✓ |
| Reinforced corrugated tubing 16mm 25m→ | 6.49 $ ✓ |
| TOTAL | 801.18 $ |
Remember that each electrical installation is different. With this entry we try to help you understand a little better how we calculate and dimension our electrical installation so that you can apply the concepts to yours.