Are you thinking of installing a system to charge your auxiliary battery while you are on the move? This solution is very useful to avoid relying solely on the sun and campsite plugs. Especially during the winter, as the days are shorter, the sky is often more cloudy and many campsites are closed… so don’t think twice! Improve the autonomy of your van and install a relay, a converter or a booster to keep your battery charged. If you want to find out which is the best option for you, be sure to read our article.
Comparison of devices for charging the auxiliary battery from the main battery
| Cheaper | Our favorite | |||
|---|---|---|---|---|
| Device | Non-automatic or “manual” relay | Automatic relay | Converter | Converter Booster |
| Price | ||||
| Installation | Needs connection to the alternator | No alternator connection required | No alternator connection required | No alternator connection required |
| Charging capacity | Up to 14.7 Ah | Up to 14.7 Ah | 10 – 40 Ah | 25 – 100 Ah |
| Operating voltage | 12 / 24 V | 12 / 24 V | Specific models :12 | 12 V12 | 24 V24 | 12 V24 | 24 V | 12 / 24 V same device |
| Stable output voltage | No | No | Yes | Yes |
| Step load | No | No | Yes (programmable models) | Yes (programmable models) |
| Loading in both directions | No | Yes | No | No |
| Dimensions | Small46 x 46 x 46 x 80 mm approx | Small46 x 46 x 46 x 80 mm approx | Medium130 x 186 x 70 mm approx | Large213 x 120 x 120 x 30 mm approx |
| Cheaper | |
|---|---|
| Device | Non-automatic or “manual” relay |
| Price | |
| Installation | Needs connection to alternator |
| Charging capacity | Up to 14,7 Ah |
| Working voltage | 12 / 24 V |
| Stable output voltage | No |
| Step charge | No |
| Load in both directions | No |
| Size | Small46 x 46 x 46 x 80 mm approx |
| Device | Automatic relay |
| Price | |
| Installation | No connection to alternator required |
| Charging capacity | Up to 14,7 Ah |
| Working voltage | 12 / 24 V |
| Stable output voltage | No |
| Staged charging | No |
| Charging in both directions | Yes |
| Size | Small46 x 46 x 80 mm approx |
| Our recommendation | |
|---|---|
| Device | Converter |
| Price | |
| Installation | Needs connection to the alternator |
| Charging capacity | 10 – 40 Ah |
| Working voltage | Specific models :12 | 12 V12 | 24 V24 | 12 V24 | 24 V |
| Stable output voltage | Yes |
| Staged charging | Yes (programmable models) |
| Bi-directional charging | No |
| Size | Medium130 x 186 x 70 mm approx |
| Device | Booster Converter |
| Price | |
| Installation | Needs connection to the alternator |
| Charging capacity | 25 – 100 Ah |
| Working voltage | 12 / 24 V same device |
| Output voltage stable | Yes |
| Staged charging | Yes (programmable models) |
| Charging in both directions | No |
| Size | Large213 x 120 x 30 mm approx |
Systems for charging the auxiliary battery on the road from the main battery
As mentioned above, having a way for the van’s secondary battery to recharge while you’re on the road will give you extra range and peace of mind. Imagine you’re in the middle of nowhere, on a dark winter’s day, worrying about whether your battery level will hold out until you find somewhere to plug in your charger…. Being able to turn on the van to charge the battery or have it recharge while you’re moving around can get you out of a pretty big jam…
So, without further ado, these are the devices that will allow you to recharge your auxiliary battery from the main battery or the alternator of your vehicle. With the table you will already have an idea, but we will now tell you the main characteristics, how they are connected and the advantages and disadvantages of each one of them.
How does a non-automatic or “manual” battery separator relay work?
To understand it in a simple way, we could say that a battery separator relay works as a switch that connects or disconnects the two batteries in parallel, depending on the fulfillment of a certain condition. If both batteries were connected in parallel, without a relay or other device to disconnect them, the charging of the main battery and the lifetime of both batteries would be put at risk.
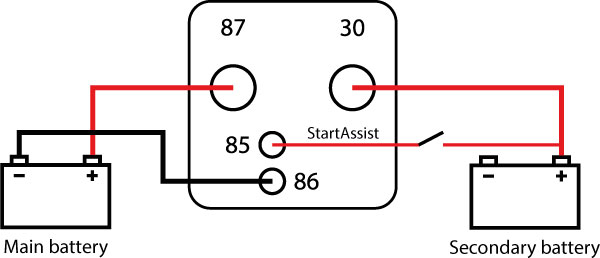
Wiring diagram of a non-automatic or “manual” relay
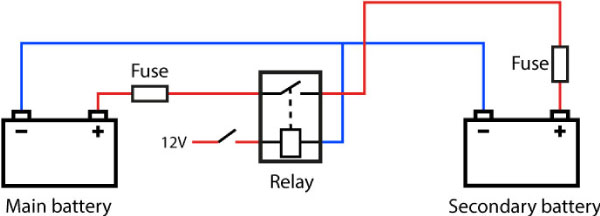
As can be seen in the diagram, a non-automatic battery separator relay has 4 connection pins. These pins are numbered marked with four numbers: 30, 85, 86 and 87. Each pin has to be connected in the following way:
- Pin 30: To the positive of the main battery of the vehicle.
- Pin 85: To ground or to the chassis of the fugoneta by means of a screw.
- Pin 86: To a source of 12V or to the alternator. It is advisable to insert a switch here.
- Pin 87: To the positive of the auxiliary battery.
The non-automatic relay will be activated, and in turn the batteries will be connected, if current arrives to its pin 86. This pin can be connected either to the alternator or to a device of the vehicle that works when this one is in march, for example to a cigarette lighter socket. When the engine is switched off, the relay will be deactivated, since pin 86 will stop receiving electricity, the circuit will be open and the batteries will be disconnected from each other.
Advantages of the non-automatic relay
- It is the most economical.
- Its disconnection is more reliable than that of an automatic relay.
- Its size is very small.
Disadvantages of the non-automatic relay
- Having to connect a 12V source to pin 86 makes it a little more complicated to install than an automatic relay.
- They do not offer a high load capacity.
- The relays cannot offer an optimal load nor program the phases of load of the battery.
Buying a non-automatic or “manual” battery separator relay on Amazon

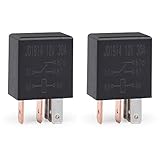

![TRUE MODS 5 Pack 5-Pin 12V Bosch Style Waterproof Relay Kit [Harness Socket] [12 AWG Hot Wires] [SPDT] [30/40 Amp] 12 Volt Automotive Marine Relays...](https://m.media-amazon.com/images/I/51YRtG1LcSL._SL160_.jpg)
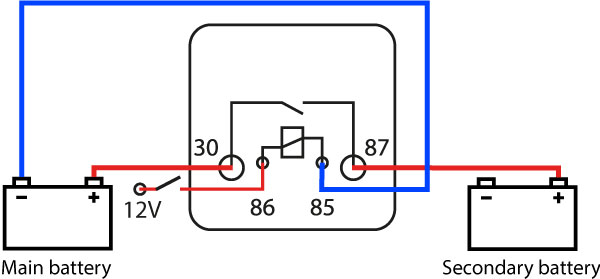
What is an automatic battery separator relay?
The main difference between an automatic and a non-automatic battery separator relay lies in the way each is activated and deactivated. While a non-automatic relay needs an external source to activate it, an automatic relay will be activated if it detects a voltage higher than its turn-on voltage which, depending on the relay, is usually between 13 and 13.8V and will be disconnected when the voltage falls below this value.
Wiring diagram of an automatic relay
As can be seen in the diagram above, an automatic relay will generally have 3 connection pins numbered 30, 86 and 87. There are some relay models that, in addition, have a fourth pin marked as start assist or pin 85. This pin allows the relay to be operated manually, by means of a push button or switch, and is used toconnect the batteries in case of emergency, either because the main battery is discharged or because it has stopped working.
- Pin 30: To the positive of the main battery of the vehicle.
- Pin 86: To the negative of the main battery, mass or to the chassis of the fugoneta by means of a screw.
- Pin 87: To the positive of the auxiliary battery.
- Pin 85 or Start assist: To the positive of the auxiliary battery, with an intercalated push button or switch.
Advantages of the automatic relay
- It is still quite economical.
- As it does not need a 12V source, it is much easier to install.
- Its size is very small.
- If the model includes start assist, it allows to start the vehicle using the auxiliary battery, in case of emergency.
Disadvantages of the automatic relay
- It can take a long time to switch off after the vehicle is turned off, putting the main battery charge at risk. This can be solved by installing a switch.
- They do not offer a high load capacity.
- The relays cannot provide optimum charging or program the battery charging phases.
Buy an automatic battery separator relay from Amazon


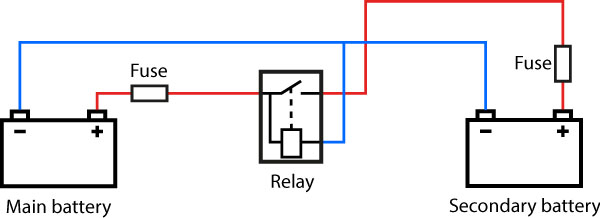
Whether the relay is automatic or not, it is advisable to install a switch so that you can disconnect it before turning off the vehicle or when driving with the auxiliary battery already charged. Remember to activate it, if you need to charge your battery, when the engine of your van is already running and always deactivate it before turning off the engine. If you forget and leave it connected when the vehicle is switched off, you can jeopardize both the charge and the life of the main battery.
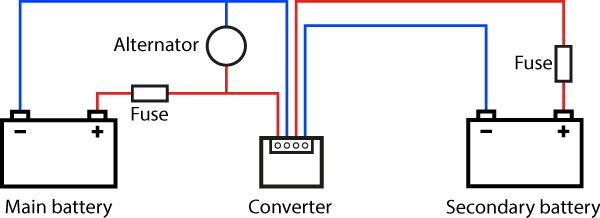
What is a DC-DC converter?
DC converters are devices that receive a DC current at a certain voltage and deliver it at a different voltage. The input voltage may vary within a specific range depending on the converter, while the output voltage is stable.
This is very useful when charging our secondary battery from the vehicle’s alternator since the alternator does not deliver an adequate current and cannot perform an optimal battery charging due to these reasons:
- The current generated by the alternator does not have a stable voltage.
- The voltage it delivers is usually very high, especially for charging gel batteries.
- Obviously, this voltage does not vary adapting to the different phases of load.
That is why the relay, although it is the most used option by the users of campers due to its low cost, is not at all the best option
On the other hand, in the market there are models of intelligent and programmable DC-DC converters that adapt the output voltage according to the charging phase in which the battery is, to get it to charge optimally, extending its life, so that, although a converter is more expensive, in the end it will be worth the investment because you will be taking care of your battery.
For all these reasons, we believe it is the best option to charge the auxiliary battery from the main battery and therefore we decided to install an Orion Tr-Smart 12|12 30A (see on Amazon).
The choice of the amperage that the converter will deliver will depend on the capacity of the battery to be charged. It is recommended to be 10% of the battery capacity.
Below is an example of a simple installation diagram:
Advantages of the DC-DC converter
- They offer a higher charging capacity.
- They deliver an electric current with a stabilized voltage.
- They usually include a phased charging algorithm to optimally and safely charge the batteries according to their type.
Disadvantages of DC-DC converters
- They are more expensive than relays.
- They have a bigger size than relays.
- Their installation is not so simple.
- A separate device is needed to convert from 12 to 12V, 12 to 24V, 24 to 24V or 24 to 12V.
Buy a DC converter on Amazon


What are the features of a Buck-Boost converter?
After searching and rummaging through the internet, to understand why buck-boost converters are so extremely expensive with respect to “normal” converters, we have come to the following conclusion, if you think we are wrong, please send us a message clarifying 😅:
With a single buck-boost converter you can convert different voltages to different voltages. It’s a bit of a mess to explain but we’ll try: While a normal converter can only convert from 12|12, 12|24, 24|12, etc. depending on the model you buy, a single buck boost device can be configured as needed.
Advantages of the buck-boost converter
- They offer higher load capacity.
- The output current voltage is stable and specific.
- They include a phased charging algorithm to optimally and safely charge batteries according to their type.
- With a single device you can convert from 12 to 12V, from 12 to 24V, from 24 to 24V or from 24 to 12V.
Disadvantages of the Buck-Boost converter
- Their price is quite high.
- They are larger in size than normal converters.
Final opinions and conclusions about battery separator relays, dc converters and buck-boost converters
Before deciding with which type of device to charge the auxiliary battery from the alternator we took stock of the features offered by each type of device, their price and the functionalities we would get with each of them and these were our conclusions about each of them:
Conclusions of the use of battery separator relays
- They are a good option if you have a very tight budget. Always installing a switch to be able to disconnect it manually when the auxiliary battery is full or when turning off the vehicle.
- Never use them to charge gel batteries, since these need a much lower charge voltage.
Conclusions on the use of DC converters
- This was our choice. It seems to us that its price, although higher than that of a relay, if you do not have an excessively big battery does not go up too much. It performs optimal charging, thanks to its phased charging algorithm and adjusts the voltage by selecting the type of your auxiliary battery. Therefore, we believe it is well worth the price as the battery life is extended
- The only drawback we find with this device is that it is much larger than a relay, so it will be one more device that will take up space in the place where you do the installation.
Conclusions of the use of DC converters
- It is not that we believe that this device is not worth the cost, but it is true that, for our use case, we did not think it was worth the investment. If in your case, you have a comfortable budget and you think you can take advantage of the ability to change the voltage settings, it is a very good option.
thank you very much for having made it this far! We hope this article has been useful for you and, as always, if you have any questions or suggestions, do not hesitate to leave us a comment 😉