
If you want to use your hairdryer or other appliances at 220V during your trip or, directly, have normal fixed sockets in the van you need to make a 220V installation Do you want to do it yourself? Read on and we will tell you everything we learned before and during our installation process. If you are not very familiar with electricity, this part will probably intimidate you a bit, but with caution and our help you will get it done 💪.
1. Which 220V electrical appliances do you want to use?
The first thing you should do is to think carefully about the consumption of the devices you want to use in the van. At this point it is important that you look at the wattage consumption of each device, and think about whether you are going to use them simultaneously, as you will have to take this into account when choosing the inverter.
Here’s our first tip: Be realistic! Certain electrical devices have a very high consumption and can drain your battery in a short time. In addition, inverters are not cheap and the more power they are capable of supporting, the higher the price will logically be.
Here’s our first tip: Be realistic! Certain electrical appliances have a very high consumption and can drain your battery in a short time. In addition, inverters are not cheap and the more power they are able to support, logically, the higher their price will be.
2. Choose the type of inverter you are going to buy.
The previous step will help you determine what minimum power your inverter will need to have. Now you will have to decide what type of inverter to buy: A pure sine wave or a modified wave inverter. If you are not clear about the characteristics of each, take a look at our entry and decide which inverter is best for your camper van.
Our choice was to purchase a Victron Energy 12/800 pure wave inverter (see on Amazon).
3. Do you want to install an external 220V outlet?
If you spend, or plan to spend, time in campgrounds, installing an external 220V power outlet for caravans (see on Amazon) can be a great idea. You could leave your van plugged to 220V continuously and without having to leave it open to put an extension cord.
If you decide to put the external socket, you may also need a power selector relay (see on Amazon) that selects the 220V power source, depending on whether the external socket is plugged in or not.
Installing the external socket is very easy, just follow these simple steps.
3.1 Draw the external socket hole in the sheet metal
Before making the hole in the sheet metal of the van, make a template on a piece of paper or cardboard, present it in the right place and mark the outline with a felt-tip pen.
3.2 Make the hole for the external socket in the sheet metal.
Use angle grinder (see on Amazon) or a jigsaw (see on Amazon) with a metal blade and make the cut. Don’t worry about getting it perfect because the outer socket has a margin that will cover the hole. Once you have the hole made, file the edge of the sheet metal and protect it from rust. As you can see in the photo, we covered it with aluminum tape, another option is to paint it. Just be careful not to cut yourself!
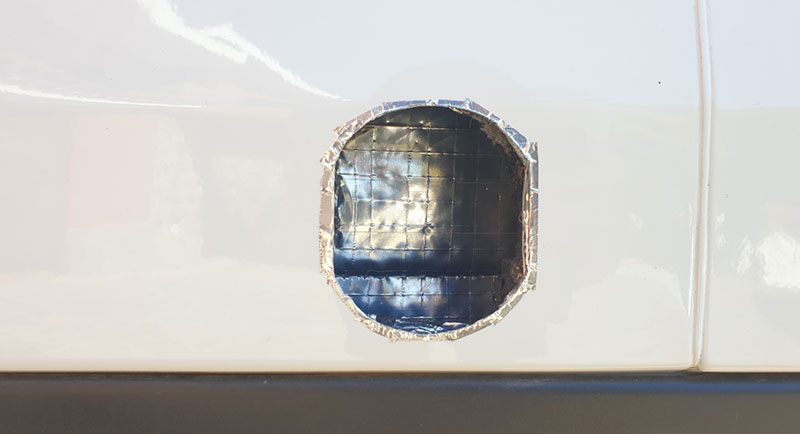
If you use a jigsaw, we advise you to cover the metal skid with a material that prevents the sheet metal from scratching. You can also stick masking tape around the entire line where you will make the hole.
3.3 Connect the cables
The external sockets usually have a protective plastic casing on the back, remove it so that you can access the cable connection area. There you will find the three screws to connect the phase, neutral and ground wires.
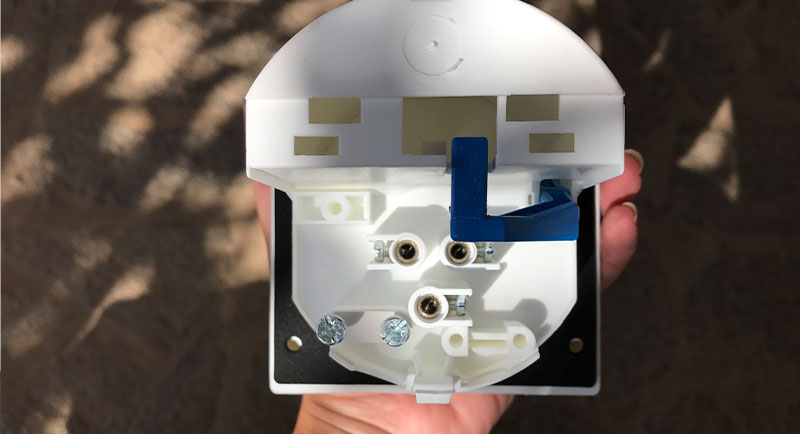
Connect all the wires and tighten the screws well so that they do not come loose. When you are going to cut the wires, leave them a little longer than you think you need, it is better to have too much than to have to tie them together because they are too short.
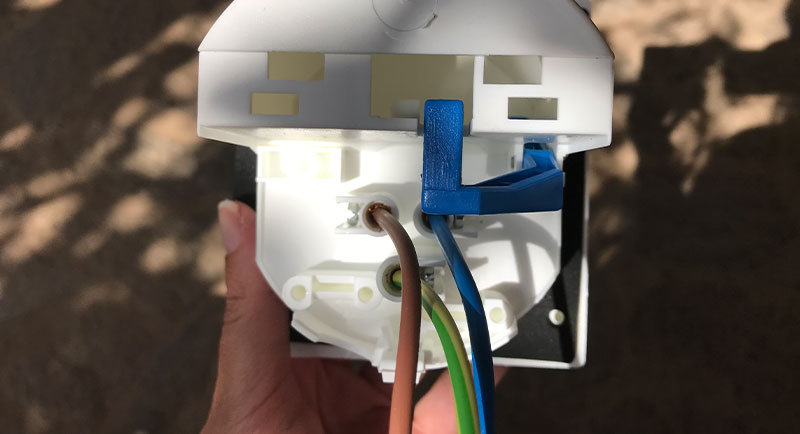
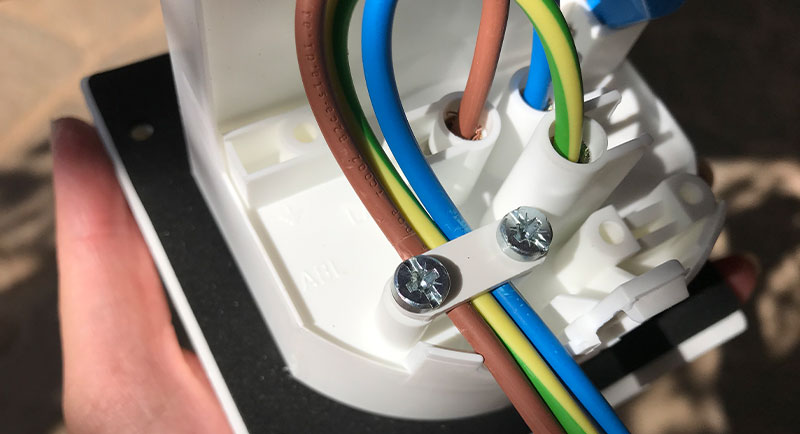
In addition, there is a plastic with two screws with which you can hold the wires so that they do not come loose if you pull them. So pass the three wires under this plastic to make them more secure and tighten the screws. Then attach the housing.
3.4 Fixes the external socket in place with rustproof sheet metal threaded screws
Most of the external sockets come ready to be fixed to the sheet metal using 4 sheet metal threaded screws. If you use self-drilling screws and a good electric screwdriver (see on Amazon) you will be able to do it in no time. Make sure it is straight.
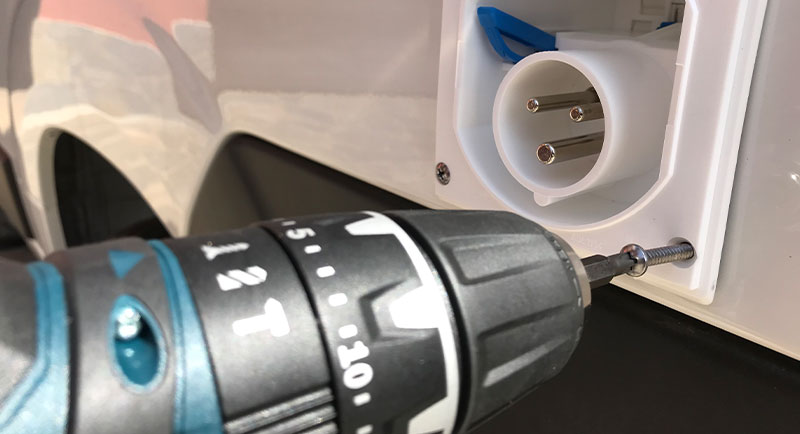
As these elements will go on the outside of the vehicle, use stainless steel screws. Also, make sure it is straight.
3.5 Adds waterproofing with outdoor silicone
The external 220V sockets for caravans (see on Amazon) usually include a rubber to prevent water leaks. In the images above you can see the rubber in black. Even so, to help prevent any water leaks, we also put a neutral silicone cord for outdoor use around the entire contour.
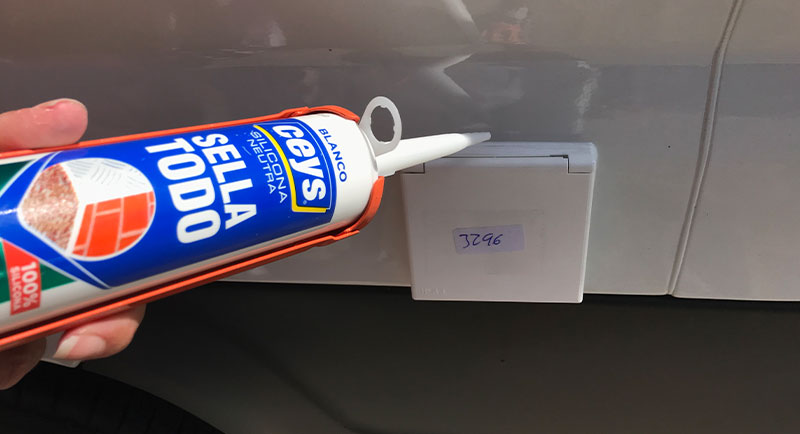
Once you have applied the silicone, dip a finger in soapy water and remove the excess silicone.
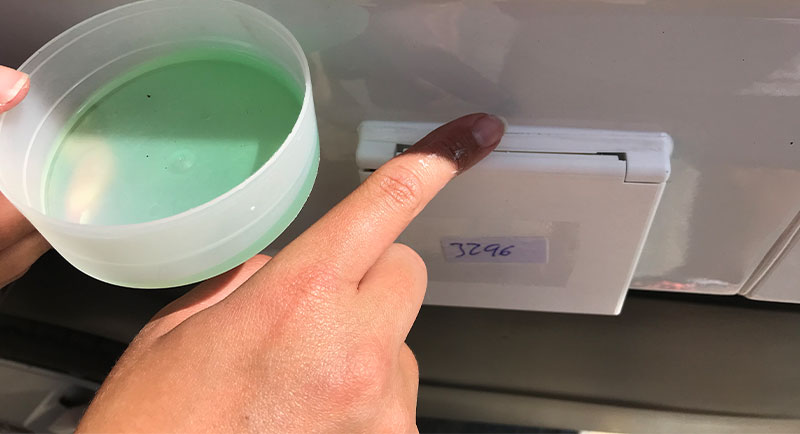
3.6 Wait for the sealant to dry
If you have followed all the steps, you will already have the external 220V socket in place! Obviously it will depend on the model, but you should have something similar to the image.
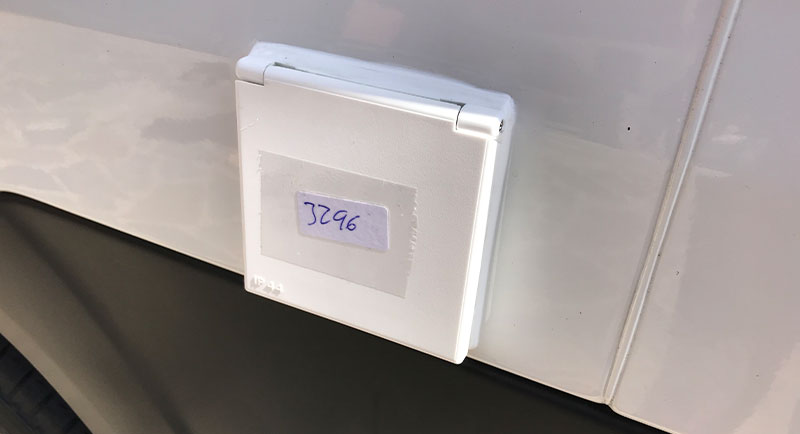
Before opening the lid or handling anything that may cause the silicone seal to be damaged, wait for the time marked by the manufacturer to dry.
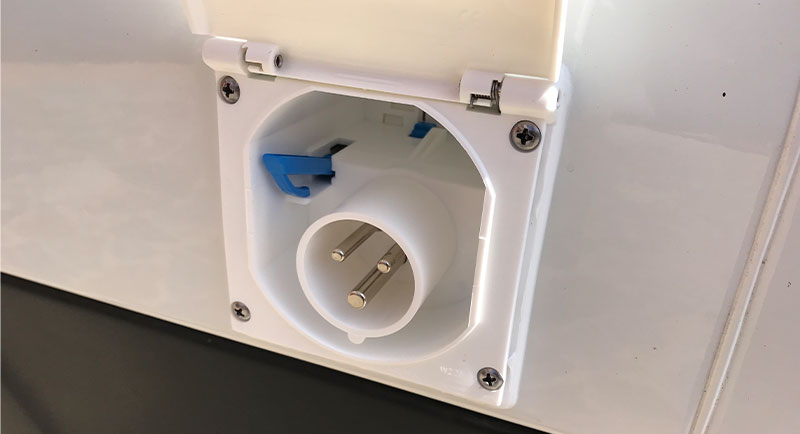
Now you will need to make the connections to make it work. Read on and we will tell you how to do it.
4. Need a battery charger? Decide which one to buy
If you are going to install an external socket you will probably need a battery charger to be able to charge your battery when you are plugged into a 220V source. Choose one that is suitable for charging your battery. To do this you must take into account:
- What type of battery do you have?
- What voltage does it work at?
- What is its capacity?
If you are not sure which battery charger to buy, take a look at our entry and choose the most suitable one for you.
We opted for a Blue Smart 12V 30A charger from Victron Energy (see on Amazon).
5. To homologate or not to homologate?
Check the laws of your country, but for example in Spain before designing the scheme of your installation you have to be clear that for a fixed 220V installation you will need a professional to check the installation and issue an electrical bulletin to approve your installation. But what does it mean to have a fixed installation.
6. Calculate the minimum section of the cables of your 220V installation.
For each device to be connected to the installation, you will have to calculate the minimum cross-section of the cable with which you will feed it. For this there are two fundamental things that you will have to take into account: The consumption of the device and the length of the cable.
This section is very important, as improper sizing could cause your devices to malfunction, or even cause the cables to degrade and cause serious damage to the installation or the vehicle.
If you are not sure how to calculate the minimum section of a cable in the electrical installation in a camper follow the link and solve all your doubts.
7. Design the electrical diagram of your 220V installation.
If you already know what elements you will need, the time has come to draw up the wiring diagram of your 220V installation. Take your time, there is no hurry. Think and analyze well how the connections of each element should be made. Having a good electrical diagram will help you not to make mistakes and will save you a lot of time during the assembly.
For your help, this is the electrical diagram we designed for our 220V installation.
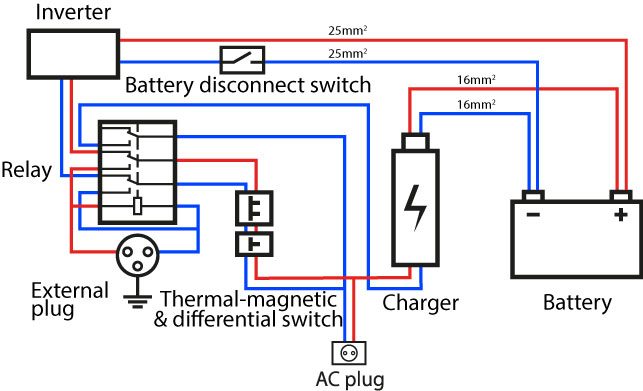
The cables whose dimension is not specified in the diagram are of 2,5mm2 section.
You should also consider how many 220V outlets you will want to have, if any, and where each one will be located.
8. Make sure you have all the necessary components and equipment.
To try not to miss anything in the middle of an installation, we always try to have a list of materials and tools with everything we will need. This way we avoid, to a certain extent, having to stop in the middle of something because we need to go out and buy something… So, in case it helps you, we leave you a small list with the most important material that we use during this installation:
Components for 220V installation
- Victron Energy 12/800 pure wave inverter (see on Amazon) ✓
- Gel battery 12V 316Ah Ultracell UCG-316-12 ✓
- Victron Energy Blue Smart 12|30A battery charger (see on Amazon) ✓
- Finder Relay 62.33.8.230.0040 (see on Amazon) ✓
- Finder 92.03 socket (see on Amazon) ✓
- Bipolar circuit breaker 10A (see on Amazon) ✓
- Bipolar differential 25A (see on Amazon) ✓
- Remote switch for the inverter ✓
- External 220V socket for motorhomes (see on Amazon) ✓
- 300A battery disconnecting switch (see on Amazon) ✓
- 25mm2 cables (see on Amazon) ✓
- 2.5mm2 cables (see on Amazon) ✓
- Cable grommets (see on Amazon) ✓
- Wire stripping pliers (see on Amazon) ✓
- Screwdriver set (see at Amazon) ✓
- Digital multimeter (see on Amazon) ✓
- X6 Eye Terminal – 25mm wire, 10mm eye (see on Amazon) ✓
- Double surface socket (see on Amazon) ✓
- X4 220V wall plug (see on Amazon) ✓
- X2 Plug male plug (see on Amazon) ✓
- Adapter female camping cable (see on Amazon) ✓
- Terminal strip (see on Amazon) ✓
- DIN rail (see on Amazon) ✓
- Stainless steel screws ✓
- Heat shrink tubing for cables (see on Amazon) ✓
- Tin soldering iron kit (see on Amazon) ✓
- Neutral anti-mildew silicone (see on Amazon) ✓
- Automotive or reinforced corrugated tubing ✓
9. Choose the central location where the installation will be
Before you start running the corrugated wires and cables, you will have to decide in which area of the van you will have the nerve center of your electrical installation. This is a very important decision, because once you run the corrugated wires and cables it will be very difficult to move everything around. So take your time, check the layout of the whole van and think it through.
We decided to put everything in the garage: the battery and the inverter on the left rear wheel arch and the rest bolted to the side wall.
10. Place corrugated wires
Once you have decided the general situation of the elements of the installation, it will be time to put the corrugated wires from where the electrical panel will be to each point where you want to have a 220V outlet.
There are many people who decide to pass the cables directly and not put corrugated tubes. We think that any protection element, that is within our possibilities, is an indispensable on our list.
This will depend very much on the condition of your van and how you want to do it. For example:
- If your van has, or will have, insulation, you can put the tubes above or below the insulation. We prefer to put them above the insulation, so that, especially in summer, the cables are a little more protected against temperature changes.
- We have seen that there are many people who choose not to use corrugated tubes to protect the cables. This, of course, is up to you, but our recommendation is to put them, either reinforced or automotive, to protect the cables against the vibrations of the vehicle…
We also put an empty corrugated pipe from the electrical panel to each of the corners of the van, just in case we need it in the future. Better to be cautious, at this point placing one tube more or one tube less does not cost anything and in the future could save us a lot of work 😉.
How are you going to fasten the corrugated pipes?
An important thing you also need to decide is what you will use to hold the corrugated pipes in place until you put up the walls and ceiling. The most “professional” thing to do would be to use some specific fastener for this, such as these self-adhesive cable ties (see on Amazon). Since we didn’t have anything like that, and neither did our usual hardware store, our experience was a bit chaotic…. We tried several things with better and worse results:
- Duct tape: The next working day, a few days later, we found most of the pipes on the floor.
- Kaiflex tape: Looking for solutions to avoid having to go out in search of flanges or self-adhesive fasteners, we saw some tutorials of people using kaiflex tape. So we also tried it and got the same result as with duct tape.
- Hot silicone: Same…
- T-Rex power: In the end we glued them with T-Rex power from Soudal (see on Amazon) and they finally held well. So, if you don’t have adhesive flanges or something similar you can use some glue of this type, which has a relatively fast drying time…
Whatever you use, make sure the tubes will hold as long as you need them to, until you cover the walls and ceiling. It’s a pain to find the corrugated pipes on the floor and have to lay them all out again.
11. Pass the cables
If you already have the corrugated tubes securely fastened, you can start running the cables. Even if the distances in the van are short, it is best to use a cable guide. To make your work easier in the future, mark the end of each cable with the name of the element to which it corresponds.
Don’t forget to mark the end of the cables with the name of the device you will connect. It will save you a lot of work when making connections.
12. Establish the distribution of the elements of your installation
If you have already designed the wiring diagram and purchased the devices you need, it will soon be time to get down to the installation of the components. But before you start fixing the devices, think about the best layout. For this we follow a few simple steps:
- Read the specifications of each device.
- Write down on a piece of paper the installation requirements for each one.:
- The installation position.
- The minimum distance you need to have to ensure good ventilation…
- Keep in mind the wiring diagram and the installation requirements of each device and distribute them, without fixing them yet, as you think is best. It may help to make a drawing on a piece of paper with the distribution, so you can make modifications until everything fits…
We decided to screw almost all the elements to the wall. So, before fixing the wall, we put it on a table and placed the elements on it to decide the best distribution.
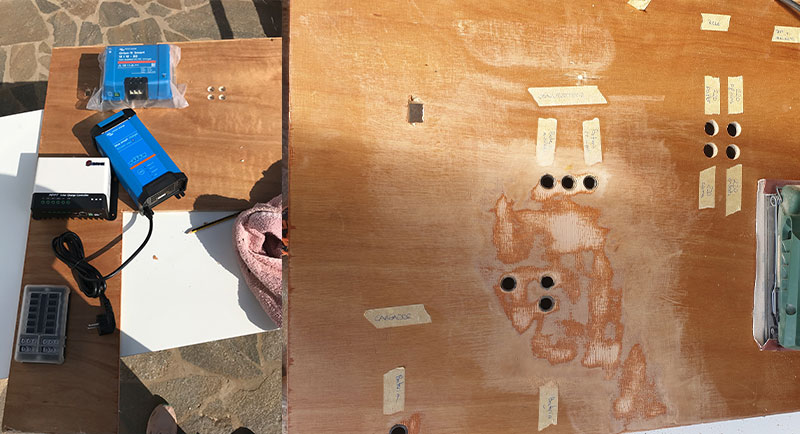
13. Fixes all elements to the support
As we have most of the electrical elements located vertically, we fix them all before connecting them. If in your case, you are going to have them horizontally, you may prefer to make the connections before fixing them, just in case moving them makes it easier for you to connect the cables.
14. Connect the cables to the devices
This is a very important step, so get to it at a time when you can concentrate and have peace of mind. Have at hand the schematic of your 220V installation, the one you prepared in step 7, take a wire stripper, a set of screwdrivers and get ready to start.
Always have the wiring diagram at hand, which you will have previously designed.

Before you start connecting cables, make sure that everything is disconnected:
- Both the circuit breaker lever and the differential lever are at the bottom….
- Battery disconnect is open.
- Inverter switch is off.
When making the connections, our recommendation is to start at one end of the schematic and work your way “forward”, for example, we start making the connections from the external socket.
14.1 Connecting the power selector relay
The power selector relay is a small device that will allow you to select the current source.
How does a power selector relay work?
If we look at the schematic again, we can see that it works roughly as follows: By default, the relay will connect the 220V sockets to the inverter output. When the external socket is plugged in, the relay will be activated and will switch to connect the 220V sockets directly to the electricity coming from the external socket.
How to connect a power selector relay?
Connecting the relay may seem much more complex than it really is. To do it right, all you need is a little patience and the connection diagram of the relay.
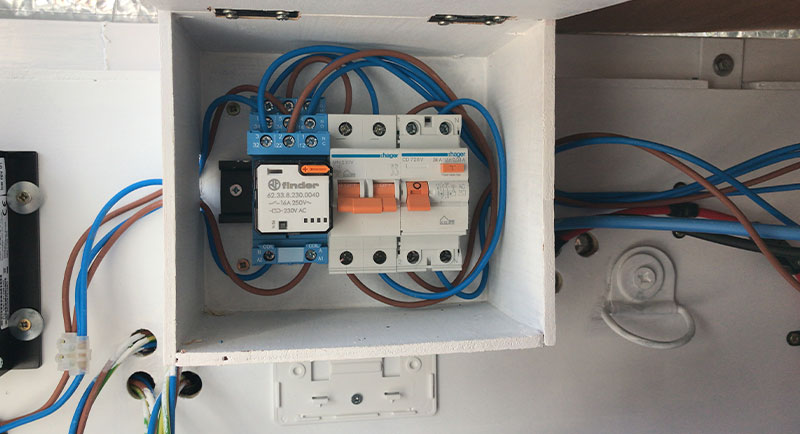
In our case, we bought a Finder 62.33.8.230.0040 relay (see on Amazon) with a Finder 92.03 socket (see on Amazon) which, in our opinion, makes the connections much easier and also allows you to attach it to a DIN rail.
Just in case you need it, we leave you a link to download the manual of a Finder 62 series relay where you can find, in addition to the technical characteristics, the connection diagrams of all the relays of the series.
We, to make the task easier and not get confused with so many connections, what we did was to look at the diagram and write down on paper which wire had to go with each number of the socket and then plug all the wires at once.
As you can see in the image, we need two wires from both the positive of the external socket (A|A1 and 5|24) and the negative (B|A2 and 6|34) so you will have to make a derivation in both wires. We use terminal blocks for this purpose.
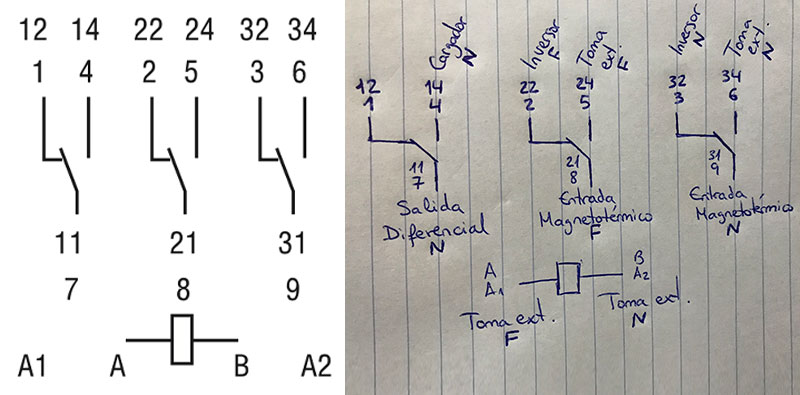
Go connecting each wire and do not forget to tighten the screws well, in case you have also bought a socket.
14.2 Connection of the circuit breaker and the differential
We have noticed that many users who have shown the process of camperization of their van have put the differential before the circuit breaker. We put in our installation the circuit breaker first and then the differential for these simple reasons:
- In the electrical panel of a house the normal thing is to find: A general circuit breaker that protects the whole installation, a differential and then another particular circuit breaker for each circuit.
- If the differential were first, this would be unprotected against overloads and short circuits.
- The circuit breaker has a wider breaking capacity than the differential.
Both devices have an input and an output for both the phase and neutral wires. As a general rule, the input is usually at the top and the output at the bottom. In addition, as can be seen in the picture, the phase wires will be on the left and the neutral wires on the right.
14.3 Connecting the plug wires
Connect the output of the circuit breakers to the wires coming from the 220V sockets according to the wiring diagram. In our case, to make it simpler, we put a double socket in the garage which we fed in the following way:
- Left socket:
- Phase: Phase wire to the differential output.
- Neutral: Connection 4|14 of the relay.
- Right socket:
- Phase: Phase cable to the output of the differential
- Neutral: Neutral cable to the differential output
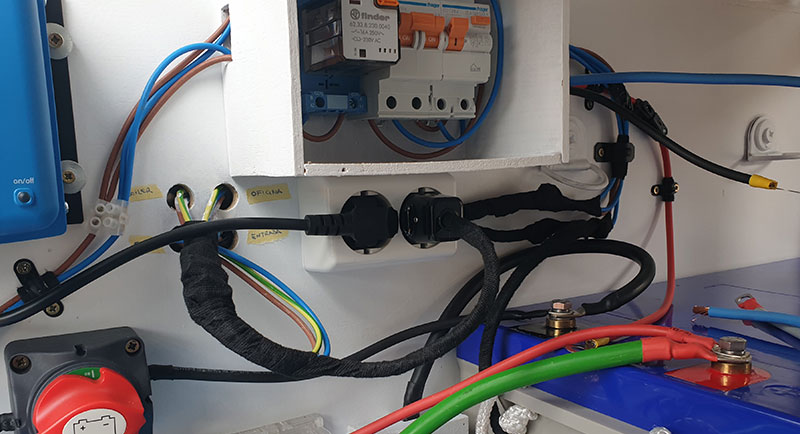
The socket of the left we use it to plug the battery charger, whereas in the one of the right would go plugged continuously a cable in which we join the coming ones of the 4 plugs that we would have distributed by the van.
14.4 Connection of the inverter
To connect the inverter to the battery we use cable of 25mm2 of section and we insert a disconnector of batteries of 300A in the negative cable. First we connect the positive cable and then the negative cable
Make sure that the inverter is turned off and that the disconnector is open.
On the other hand, we use 2.5mm2 cable (phase, neutral and ground) and a male plug to connect the inverter output as follows:
- Phase: Connection 2|22 of the relay.
- Neutral: Connection 3|32 of the relay.
- Ground: Ground of the right socket of the double plug.
When making the connections, always have the schematic of your installation at hand. It will be much easier for you to make the connections correctly.
15. Test of the 220V installation
If you have everything connected, it is time to check that everything is working correctly. Remember that you will have to test that the installation works with the battery and the inverter, as well as with the external socket plugged in.
We first test the installation with the inverter in the following order:
- We activate the battery switch.
- We raise the automatic ones (Magnetothermal and differential).
- We turned on the inverter.
- We plugged in a cell phone charger.
- We checked that the cell phone was charging correctly.
Then we checked that the relay was working correctly by plugging in the external socket:
- We turned off the inverter.
- We plugged the external socket into a power outlet using an adapter.
- We plugged in a cell phone charger.
- We checked that the cell phone was charging correctly.
Approximate budget for a 220V installation
220V INSTALLATION
| PRICE | |
|---|---|
| Victron Energy 12/800 → pure wave inverter | 288 $ ✓ |
| Ultracell 12V 316Ah gel battery UCG-316-12 → | 451.72 $ ✓ |
| Charger Victron Energy Blue Smart 12/30A → | 194.79 $ ✓ |
| Power selector relay Finder 62.33.8.230.0040 → | 17.6 $ ✓ |
| Finder socket 92.03 → | 8.28 $ ✓ |
| Double-pole circuit breaker 10A → | 8.5 $ ✓ |
| Two-pole differential 25A → | 15.99 $ ✓ |
| Remote switch for inverter → | 24.5 $ ✓ |
| External 220V socket for motor homes → | 13.78 $ ✓ |
| Battery disconnector 300A → | 26.22 $ ✓ |
| 25mm2 cables → | 13 $ ✓ |
| 16mm2 cables → | 7 $ ✓ |
| 2.5mm2 cables → | 33 $ ✓ |
| Cable glands → | 4.99 $ ✓ |
| Wire stripping pliers → | 15.99 $ ✓ |
| Screwdriver set → | 11.66 $ ✓ |
| Digital multimeter → | 15.99 $ ✓ |
| X6 Eye terminal – 25mm cable, 10mm eye → | 9.98 $ ✓ |
| Double surface socket → | 6.79 $ ✓ |
| X4 220V wall socket → | 57.98 $ ✓ |
| X2 Male plug → | 2.34 $ ✓ |
| Camping cable adapter female → | 18.21 $ ✓ |
| Terminal strip → | 0.5 $ ✓ |
| DIN rail → | 3.99 $ ✓ |
| Stainless steel screws → | 2.5 $ ✓ |
| Neutral anti-mildew silicone → | 5.95 $ ✓ |
| Heat-shrinkable tubing for cables → | 8.99 $ ✓ |
| Tin soldering iron kit → | 23.99 $ ✓ |
| Reinforced corrugated tubing 16mm 25m → | 6.49 $ ✓ |
| TOTAL | 1298.72 $ |
Remember that every electrical installation is different. With this entry we try to make you understand a little better how we calculate and dimension our electrical installation so you can apply the concepts to yours.
