Many of us tend to believe that a 12V installation is harmless, since a discharge at this voltage will not cause any personal injury. What we do not usually think is that at this small voltage, high currents can be transmitted which, if the installation is not well dimensioned and protected, can cause damage to the installation, and to what is around it. That said, you should not worry too much, with all the information and advice we offer you can make sure that your 12V installation is 100% safe and reliable. Shall we start?
1. Assess your needs and calculate your theoretical consumptions.
To correctly size the elements of your installation you should calculate what theoretical consumptions you plan to have. First of all, you must be realistic. Be clear from the beginning that living or traveling in a van implies having a simpler life and that you must give up certain “luxuries” that you have living in a house or vacationing in a hotel. It is the price to pay for having the freedom and many other advantages offered by the lifestyle we have chosen…
You should also give some thought to what your needs are and what resources you have available. You may find it helpful to answer these simple questions:
- What budget do I have to invest in the electrical system?
- How much space do I have for the battery?
- What consumption at 12V will I have?
- How long will I use, on average, each device?
- How am I going to recharge the auxiliary battery?
Once you answer these questions it will be easier to calculate the battery capacity you need or can afford. If you still do not see it clear, we leave here the link to our electrical consumption calculator for camper van. With it you can get a general idea of what devices you may need to be energy self-sufficient.
2. Choose which auxiliary battery you are going to buy.
After the first step you should already know the minimum capacity you need your auxiliary battery to have. From there, the higher the capacity, the more autonomy you will have and the less charge and discharge cycles the battery will undergo, which will help to extend its useful life. That is why, if you are going to use the van for long periods of time, we recommend that you put the highest capacity battery you can. Obviously this is a personal opinion, and maybe not entirely objective, since we live and work in our camper.
That said, apart from the capacity, you will also have to decide which is the best auxiliary battery for your camper van. If you are still not clear about what types of battery there are and what features each of them has, follow the link, read our other post and come back here when you are sure.
Our choice was the Ultracell UCG-316-12 12V 316Ah gel battery
3. Are you going to install a solar system?
At this point you should ask yourself if you plan to have a solar installation or not Why? Because, although we have seen that many users, even if they have a solar installation, feed the fuse holder directly from the battery, the best thing to do would be to install a solar regulator with DC output and feed it from this output. So, if you plan to install a solar panel, do things right and buy a solar regulator with DC output.
4. Calculate the minimum cable cross-section of your 12V installation
This is something that you will have to do with each of the electrical components that you are going to install. There are manufacturers that specify in their manuals what minimum cable section the device needs, if this is not the case, you will have to do the calculations yourself. To do this you will need to know the power consumption of the device, the working voltage and the length of the cable.
This step is very important to minimize the different types of risks that can affect your installation, such as:
- Voltage drop that prevents correct operation of the devices..
- Degradation of cables due to overheating.
- Fire.
If you are not quite sure how to calculate the minimum cross-section of a cable in the electrical installation of your van, our article will help you with the task
5. Design the electrical diagram of your 12V installation
If you are sure which components you need, you are now ready to prepare the electrical schematic design of your 12V installation. Below we show you the image of two simple examples.
Wiring diagram for simple 12V installation
In this first example we have a 12V installation without solar installation. It can be seen that the fuse holder is fed directly from the auxiliary battery. From the fuse holder, as its name indicates, it will contain the fuses that will protect the cables that will go out to the different consumables.
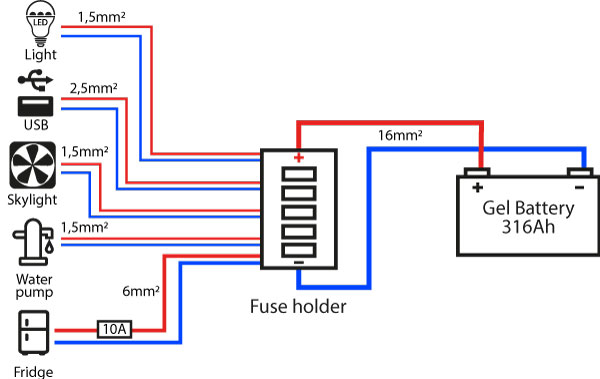
Wiring diagram of 12V installation with solar installation
This other example shows an electrical installation that also contains a solar installation. In this case the fuse holder is powered from the DC output of the solar controller. This is how we did the installation of our van.
If you have looked at the schematic, you will have noticed that we powered the refrigerator directly from the battery. We did this because, due to the electronics they contain, refrigerators are quite sensitive to voltage drops, so we were recommended to make the connection in this way and with a 6mm2 cable section.

Power the refrigerator directly from the battery, with a 10 AWG2 section cable and a fuse to protect it
6. Make sure you have all the necessary components and equipment.
Before you start, make sure you have everything you need. As always, here is a list of the most important materials and tools we use during this installation. You may find it useful to make sure you don’t forget to buy anything.
Material for 12V installation
- Gel batteries 12V 316Ah Ultracell UCG-316-12 ✓
- Portafusibles 12V (ver en Amazon) ✓
- 12V fuse kit (ver en Amazon) ✓
- Gauge Fuse Holder(ver en Amazon) ✓
- 6 AWG cable (ver en Amazon) ✓
- 10 AWG cable (ver en Amazon) ✓
- 14 AWG cable (ver en Amazon) ✓
- 16 AWG cable (ver en Amazon) ✓
- Cable crimping set for cable terminals (ver en Amazon) ✓
- 12V USB Charger Socket (ver en Amazon) ✓
- LED Panel Light DC 12V 3W (ver en Amazon) ✓
- Digital multimeter (see on Amazon)
- Wire stripper pliers (see on Amazon) ✓
- Screwdriver set (see at Amazon) ✓
- Fish Tape (see on Amazon) ✓
- X2 Eye Terminal – Cable 25mm, eye 10mm (see on Amazon) ✓
- Tubo corrugado de automoción o reforzado ✓
7. Choose the place where each element of the installation will be located.
Before you start running tubes and cables, you will have to think about where you are going to place each element of the installation: The battery, the fuse holder(s), the lights, the USB plugs, etc. This step will be easier or more complicated depending on the complexity of your installation.
We located the main electrical components on the left side of the garage. In addition, we decided to put a fuse holder on each rear side of the van, just behind the wheel arch.
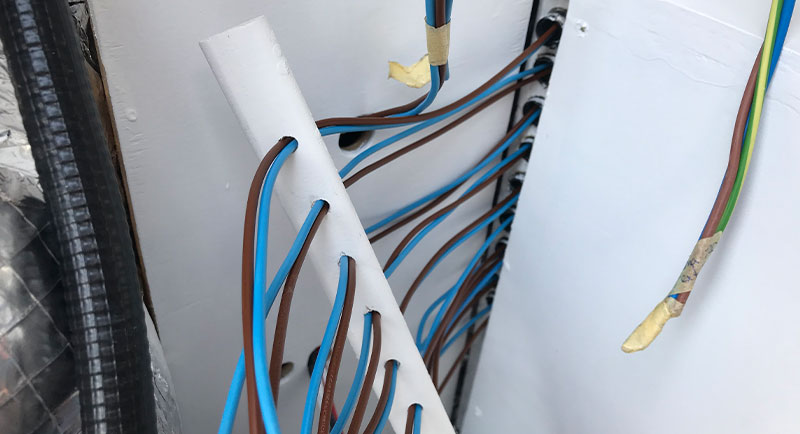
8. Put the corrugated pipes
Once you know where each element will be located, you will have to place the corrugated wires from where the fuse holder will be located to each point where you will have a 12V electrical consumable. We put a corrugated wire for each electrical point needed. Perhaps we have sinned of exaggerating, but we preferred that by each tube only a pair of cables passed, this way if in a future we needed to pass more cables, there would be more than enough space.
There are those who decide not to put corrugated wire and put the cables directly. Our recommendation is to use any safety element, which is within our possibilities. Corrugated wire is cheap and very useful in this sense.
We also put an empty corrugated wire from the electrical panel to each corner of the van, just in case we need it in the future. Better to be cautious, at this point placing one tube more or one tube less does not cost anything and in the future it could save us a lot of work 😉.
How to fix corrugated wires?
At this point it is important that you think about how you will attach the corrugated wires, at least until the walls and ceiling are put in place. The best would be to use self-adhesive cable ties (see on Amazon) or something similar. If you don’t have the means to get them you can try to glue them with some mounting adhesive that dries fairly fast.
We tried to stick them first with duct tape, then with hot silicone, then with kaiflex adhesive tape and had no success. After a few days we found all the tubes on the floor. So we decided to try Soudal T-Rex power (see on Amazon) and finally! they stayed in place.
Whatever you choose, make sure it’s strong enough to hold up as long as you need it to. It’s a real bummer to open the van and find all the tubes on the floor….
If a consumable is going to have a switch, do not forget to pass the tube where you are going to put it. Sometimes, with enthusiasm and haste, silly mistakes are made…
9. Pass all cables
If you see that the tubes are holding well, you can start to pass the wires with the help of a cable guide (see on Amazon). Stick a label or a piece of masking tape on the end of each wire with the name of the element to be connected. Keep in mind that you will end up with a big jumble of wires and it will probably take a long time from the time you run the wires to the time you connect them. If you label them from the beginning you will save yourself a lot of work in the future.
10. Tidy up all cables
If you have a considerable number of consumables, as we do, and you have already run all the wires, you will have a jumble of wires where you are going to put the fuse holders. It will probably do you some good to organize them a bit before you go any further with the connections.
Idea to organize cables in a camper van
Surely there are many better ways to organize the cables. We wanted to use materials that we already had at home and the truth is that we were quite happy with the result. Here’s more or less how we did it:
First, we cut a strip of wood and cut a series of holes in it, aligned vertically, of the diameter of the corrugated wires. We inserted each tube through a hole and fixed the strip inside the box we made to cover the wheel arch.
Then we took a strip of pine and made another row of holes with a diameter just large enough to fit the wires we had to pass through. We painted it white and passed the wires through the holes.
Finally we fix the pine lath to the box that covers the wheel arch.
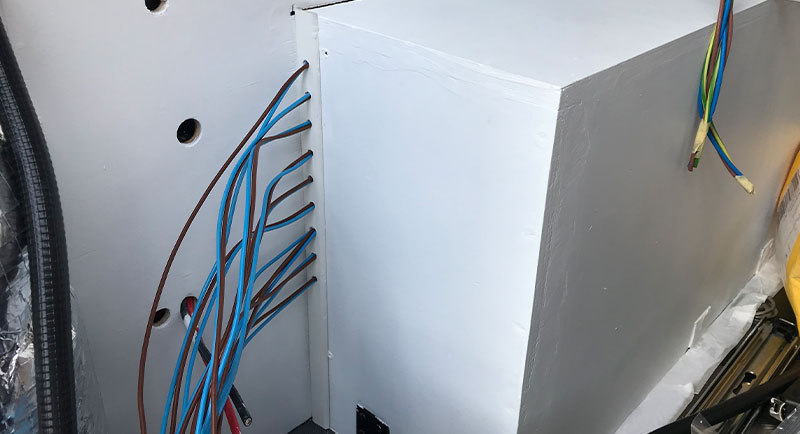
In addition, we used steel clamps to fix groups of cables to the wall to make them tidier.
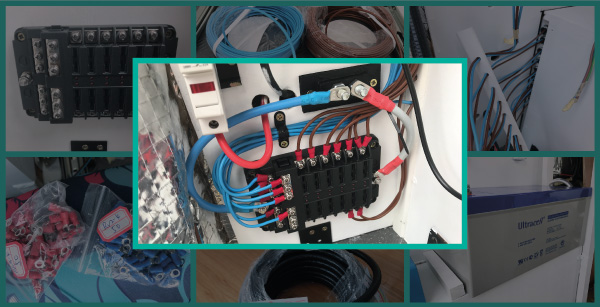
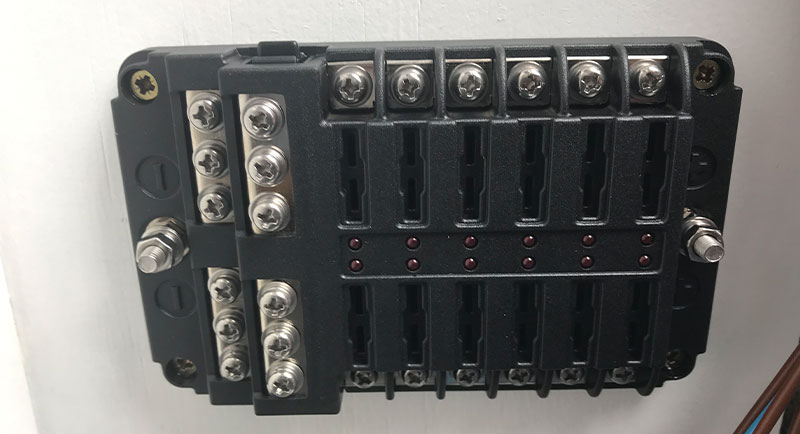
11. Fix the fuse holder in place.
As we put both fuse holders bolted to the wall, it was easier for us to anchor it before connecting all the cables. You may prefer to connect the wires before fixing it to have more room for flexibility, this is up to you.
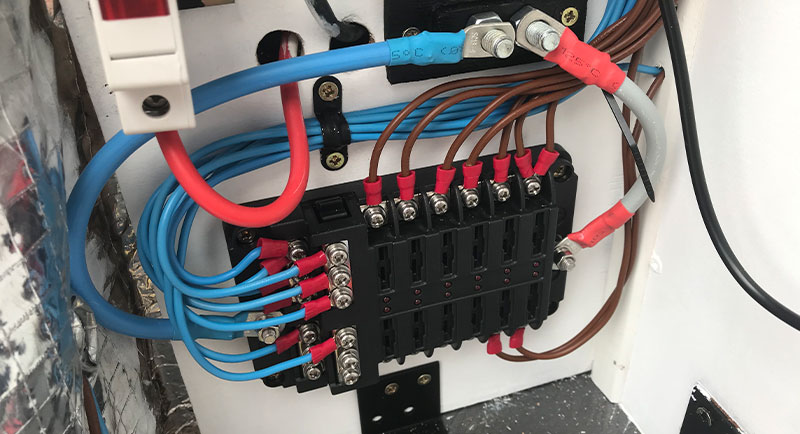
12. Connect the consumable cables to the fuse holder.
When you are going to connect the wires you will have to prepare the terminals. Use a crimp terminal set (see on Amazon) and put an eye terminal on each one. Plug the wires into the fuse holder and mark which device each positive wire belongs to.
Fuse holders usually include a series of labels on which you can write the name of the device that is connected to each input. You can use them or mark each wire any way you want, but don’t forget to do it! If you don’t, it will be a mess later to know which is which.
Don’t forget to name each fuse with the item it is connected to. Also, make sure the screws are tightened securely.
13. Feeds the fuse holder
When you have all the consumable cables connected to the fuse holder, power the fuse holder. To do this you will have to pass a wire from the positive DC output of the regulator or from the positive of the battery, to one of the two large screws at the ends of the fuse holder, in this case the screw marked with a +. Then do the same with the -, from the negative output of the regulator or from the negative of the battery.
14. Connect consumable devices
It is possible that there are elements that you can not install until you have not put the walls, ceiling or other elements. If this is the case you can always test that everything is working properly by temporarily connecting the fixtures. This can help you to detect if there has been a mistake with the installation before it becomes more difficult to fix.
15. Fit the fuses
Calculate the size of each fuse taking into account the cable section to be protected and the amperage consumption of the appliance it connects. Once you have made the calculations, take the fuse and put it in place.
16. Check that everything is working properly
If you have followed all the steps correctly the devices you have connected should work normally. Confirm that everything is OK. If not, check that all the connections of the installation are properly made. If necessary, use a multimeter to find the problem and solve it.
Approximate budget for a 220V installation
12V INSTALLATION
| PRECIO | |
|---|---|
| Ultracell 12V 316Ah Gel Battery UCG-316-12 → | 451.72 $ ✓ |
| X2 Fuse holder 12V → | 49.98 $ ✓ |
| Medium fuses → | 9.99 $ ✓ |
| Aerial fuse holder for 5x20mm fuses → | 5.9 $ ✓ |
| Cylindrical fuse set 5x20mm 10A → | 9.49 $ ✓ |
| 6 AWG Cables → | 7 $ ✓ |
| 10 AWG Cables → | 2.04 $/m ✓ |
| 14 AWG Cables → | 2.71 $/m ✓ |
| 16 AWG Cables → | 44 $ ✓ |
| Cable crimping set for cable terminals → | 36.99 $ ✓ |
| X3 Recessed USB plug → | 34.96 $ ✓ |
| X10 Recessed LED spotlight → | 44.97 $ ✓ |
| Digital multimeter → | 15.99 $ ✓ |
| Wire stripping pliers → | 15.99 $ ✓ |
| Cable grommets → | 4.99 $ ✓ |
| X2 Eye Terminal – Cable 25mm, eye 10mm → | 3.88 $ ✓ |
| Corrugated wire reinforced 16mm 25m → | 6.49 $ ✓ |
| TOTAL | 731.1 $ |
Remember that each electrical installation is different. With this entry we try to help you understand a little better how we calculate and dimension our electrical installation so that you can apply the concepts to yours.