Do you already know how you are going to charge your auxiliary battery and do you have to decide between the different methods? If you have doubts or simply need more information about the different ways to charge the auxiliary battery to achieve the long-awaited energy independence, read on and you will find out!
As you already know, there are three main ways to charge the auxiliary battery in a camper van: through a solar panel, through the vehicle’s main battery or using a battery charger.
How to recharge the auxiliary battery using a solar panel?
If you are already, or have been a camper, you will know that in this lifestyle you have to make the most of every resource available to you. That’s why we never hesitate to put a solar panel on the roof of our van. Here we will not tell you how to make the solar installation step by step in a camper van, nor how it works in detail, for that we already have another post. Here we will only explain what a solar installation consists of and what elements form it.
Wiring diagram of a solar installation
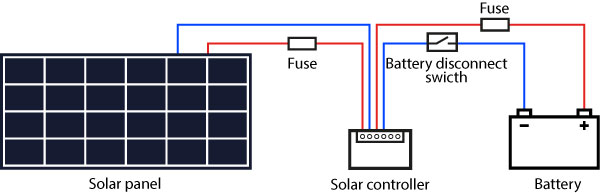
As can be seen in the diagram, the installation consists of a solar panel, a solar regulator, a battery disconnector, a battery, two fuses and cables. In our case, these were the elements we installed:
Elements of our solar installation
- Mono PERC 455W solar panel ✓
- MPPT controller 100V 30A with Bluetooth 12/24V ✓
- Gel battery 12V 316Ah Ultracell UCG-316-12 ✓
- 300A battery disconnect switch (see on Amazon) ✓
- 16A cylindrical fuse (see on Amazon) ✓
- 10×38 fuse holder (see on Amazon) ✓
- ANL 300A fuse and fuse holder (see on Amazon) ✓
- MC4 connectors (see on Amazon) ✓
- Double cable glands (see on Amazon) ✓
- 8 AWG cables (see on Amazon) ✓
- 10 AWG wires (see on Amazon) ✓
How does the solar installation work on a van?
The operation of the photovoltaic installation, explained in a very simple and simplified way is as follows:
The cells of the solar panel collect the sun’s rays and generate the electricity that comes out through the wires. This electricity reaches the charge controller, which controls the charging of the battery.
How to charge the battery through the main battery or the alternator?
As owners and users of a camper van, we found it a real pity not to take advantage of the charging capacity offered by the alternator and recharge our battery when we were on the road. We also thought that, especially in winter, with the shorter and more cloudy days, having this possibility could get us out of more than one trouble.
This type of charging can be done using different elements, if you want to know how they work in depth, read everything you need to know about relays, converters and boosters for campers, we will explain below
The most common method: By installing a separator relay
Although this is not the best method for charging an auxiliary battery, it is the most common method used by users, probably because of its low cost. Basically what a separator relay does is to connect or disconnect the batteries (main and secondary) when certain conditions are met.
In particular, there are two types of relays, non-automatic and automatic.
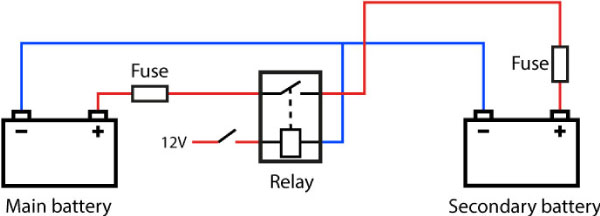
How is the battery charged with a non-automatic or “manual” separator relay?
This type of relay needs to be connected, through pin 86, to a 12V input source or to the alternator so that, when receiving current, it activates and connects the batteries.
Manual connection by means of a switch: With this option you will have to intercalate a switch between the relay drive pin and a 12V source, so that it is activated by means of the switch.
If you are thinking of installing a non-automatic relay, you may find this list with the necessary elements useful:
Elements for the installation of a non-automatic relay
How do you charge the battery with an automatic separator relay?
An automatic battery separator relay does not need to be connected to an external source that drives it, it will simply be connected to both batteries and will activate if it detects a voltage higher than its activation voltage, which is usually between 13 and 13.8V
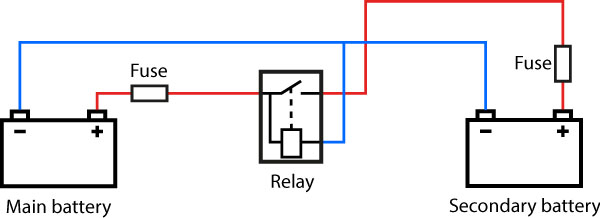
It is advisable to intercalate a switch to have the possibility of controlling the connection and, especially, the disconnection of the relays.
If you have decided to install an automatic relay, these could be the elements you need to buy:
Elements for the installation of an automatic relay
BEST option? Install a DC converter or booster
DC-DC converters are electrical devices used to transform an input DC current with a given voltage into an output DC current with a different and stable voltage.
There are intelligent and programmable models on the market that adapt the output voltage according to the charging phase of the battery. This is very useful for us, since the current delivered by the alternator is not an adequate current to charge our batteries due to the following reasons:
- It does not have a stable voltage.
- It is a very high voltage, especially to charge gel batteries.
- Obviously, it does not vary to adapt to the different phases of load.
These characteristics make that, in our opinion, it is the best option to charge the auxiliary battery from the main one. This is an example of a simple connection diagram.
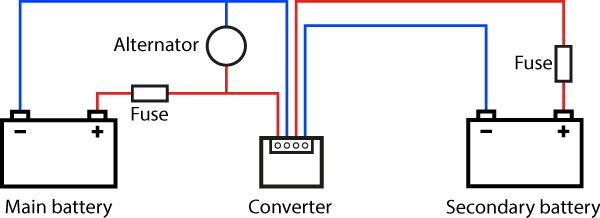
We, in our van, made the installation as shown in the diagram, using the following components: A converter, two fuses, cables and a small switch that can be connected to some remote activation pins of the converter.
Elements for the installation of a DC-DC converter
Charge the battery using a charger
If you are a regular user of campgrounds a battery charger should be indispensable in your electrical setup. We don’t usually go camping, but we decided to put in a battery charger to have one more charging option, which can get us out of some trouble, especially, during the winter.
There are many brands and models of battery chargers on the market, with a wide variety of features and prices. To help you narrow down the wide range of possibilities, we are going to make three simple suggestions that we used to make our choice:
- The charger should be capable of delivering 10% of the current of your battery’s capacity. This means that if your battery is 100Ah your charger should be 10A.
- It has to be suitable for charging the type of battery you use. Not all are suitable for charging gel or AGM batteries. It is best to choose one that allows you to select the type of battery to charge.
- It should have step charging Do you want to know what are the stages of charging a battery?
As you can see in the diagram, in addition to the charger, we install an inverter, an external 220V socket and we connect everything by means of a Finder power relay. This relay, as shown in the diagram, works as a switch that automatically closes the 220V circuit with the external socket or with the inverter, depending on whether or not it receives electricity from the external socket.
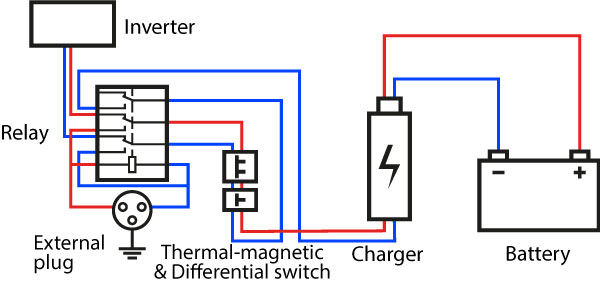
The diagram shows an installation with fixed charger. For this installation the necessary elements would be the following ones: A battery charger, a power selector relay, a fuse, a differential, a circuit breaker, an external 220V socket and cables.
You could also simply use a charger and plug it into a normal 220V outlet when you are going to use it and connect it directly to the battery.
In the end we decided that the output of the relay, after the differential and the circuit breaker would go to a normal 220V socket and there we would plug the charger, we would not leave it connected in a fixed way. Therefore, this is the list of elements that we use in our van:
Elements for the installation of a charger
- Victron 30A battery charger (see it on Amazon) ✓
- Power selector relay Finder (see on Amazon) ✓
- 30A Inline Circuit Breaker Reset Fuse (see on Amazon) ✓
- 14 AWG wire (see at Amazon) ✓
- Eye terminals (see on Amazon) ✓
- Bipolar differential 25A (see at Amazon) ✓
- Magneto bipolar 10A (see on Amazon) ✓
- 220V socket for DIN rail (see on Amazon) ✓
- 220V external socket for van (see on Amazon) ✓
Conclusions on how to recharge the auxiliary battery in the camper
As you may already know, when camperizing a van, the subject of electricity is one of the most headache-inducing. In our case, being both computer scientists, we need to have electricity to be able to work. That is why we wanted to try to ensure the maximum autonomy, within our means, and install several options to keep our “small” 316Ah battery charged.
Therefore, assess your needs, the type of use you will give to your van and your economic possibilities and decide what is best for you. Our recommendation is the following:
- Gel or AGM battery, the bigger the better.
- Solar installation with MPPT regulator.
- DC-DC converter to charge the battery from the alternator.
- If you are a camping user: Battery charger yes or yes.