Do you want to install a flexible solar panel to have more freedom in your camper van? What a great idea! Read our post to discover how to protect your van and not take any unnecessary risks… you won’t regret it!
How NOT to install a flexible solar panel on a camper?
Most people just stick the flex panel to the roof with some kind of polymer glue or special adhesive tape. Honestly, we do NOT like that idea at all… for three main reasons:
- Perhaps we err a bit on the side of paranoia, but the idea that the panel (or any other element) could fly off the van during driving worries us a lot…. Silicones and glues degrade over the years, so we prefer a more robust fastening system than just glue… It is true that a flexible solar panel is very light, but every precaution is too little…
- A solar panel has a considerable surface area. Covering such a large area of the roof with glue does not seem to us very appropriate, if at some point you wanted or had to change or remove the plate would be a considerable hassle to remove all that glue.
- The solar panels can develop hot spots that can overheat areas of the panel and everything underneath. If this were to happen it could damage the paint on the roof or even, if the roof is made of fiber, it could melt or warp.
A hot spot on a flexible solar panel can ruin your van roof
If you think this title is an exaggeration to attract attention, you are wrong…. This has already happened to several users who have glued their flexible solar panel directly to the roof of their van, either because it was recommended to them or because no one warned them that doing so was not safe.
Below you can see what happened 😱 to the roof of the vans of three users of the furgovw.org forum. This same thing could happen to you if you decided to glue the flexible solar panel to the roof of your vehicle….
Paint deterioration due to hot spot on flexible solar panel
In the center image you can clearly see the hot spot on the panel. In this case, the solar panel was glued to a normal, sheet metal roof, so the damage occurred primarily as a major paint burn.
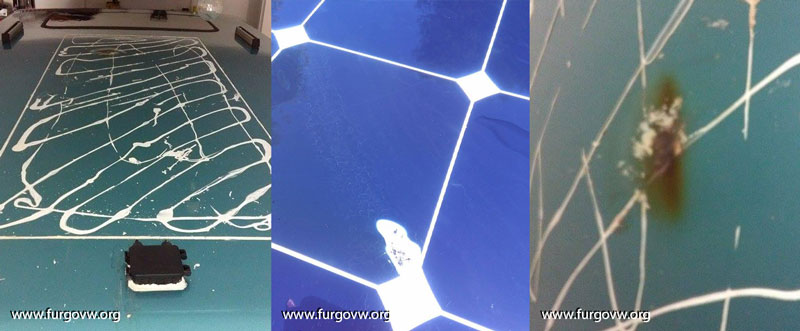
Roof sheet metal damage by hot spot on flexible solar panel
This time the damage caused by the hot spot was deeper. In the image you can see that the burn went through the paint and reached the roof sheet metal.
Melted fiber roof due to hot spot on flexible solar panel
Finally, we have the state the fiber roof of a California was left in about 6 months after the flex panel was installed. It can be seen that the general heat given off by the panel deformed the roof over almost the entire surface that was in contact with it. In addition, a deeper burn caused by the hot spot on one side is visible.
The truth is that it is a pity that, due to our ignorance or that of some sellers who do not give enough advice, things like this can happen. That is a fear that I suppose that all people who have been encouraged to build their own camper have felt on many occasions: Am I doing it right? Do I have all the necessary information? Am I missing something? So our recommendation is the following:
Read, search for information and ask any questions that come up and when you have the information THINK and REASON if what you have found out makes sense. Remember that the information on the internet can be written by anyone, with the best or the worst of intentions… Be critical and analyze. The life of your van depends on it 😉
How to install a flexible solar panel without a hot spot ruining your van?
If you are reading this post you will already know that installing a flexible solar panel has many advantages:
- It’s lightweight.
- It’s so thin that it barely protrudes from the roof.
- It is very easy to install.
That’s why many users decide it’s the best option. If you’re one of them, you’ll surely be interested to know a way to greatly reduce the risk of a hot spot. If so, read on for our step-by-step guide.
1. Make sure you have all the necessary components and material
As always, you must first make sure you have all the necessary components and material. To make your job easier, make a list of everything you need and cross off what you already have.
Material for the installation of a flexible solar panel
- Renogy Flexible Monocrystalline Solar Panel 200 Watt 12 Volt (see on Amazon) ✓
- Polycarbonate plate 6mm (see on Amazon) ✓
- MPPT Solar MPPT Controller (see on Amazon) ✓
- LCD Display Remote Meter (see at Amazon) ✓
- 100Ah AGM Battery (see on Amazon) ✓
- 10 Gauge AWG cables (see on Amazon) ✓
- MC4 connectors (see on Amazon) ✓
- Double cable glands (see on Amazon) ✓
- G15A fuse + fuse holder (see at Amazon) ✓
- ANL 150A fuse + fuse holder (see on Amazon) ✓
- Battery disconnector 300A (see on Amazon) ✓
- Digital multimeter (see on Amazon) ✓
- Wire stripper pliers (see on Amazon) ✓
- Screwdriver set (see at Amazon) ✓
- Fish Tape (see on Amazon) ✓
- X2 Eye Terminal – Cable 25mm, eye 10mm (see on Amazon) ✓
- Automotive or reinforced corrugated tubing ✓
- Polyurethane adhesive (see on Amazon) ✓
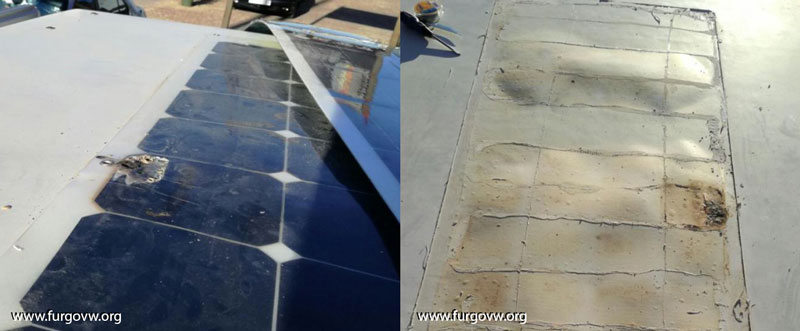
2. Prepare a support for the flexible solar panel
Polycarbonate sheets are a great insulating material as they have a honeycomb structure with channels running the length of the panel that promote ventilation. They are also very light and resistant to inclement weather, which comes in handy for the use we want to give it.
So, next you need to take the polycarbonate plate (see on Amazon) and cut it to the size of the solar panel.
3. Glue the polycarbonate sheet to the roof of the van
To attach the polycarbonate sheet to the roof of the vehicle you can use a polyurethane glue type sikaflex (see on Amazon). Simply pour a generous wave-shaped bead over the entire surface of the sheet.
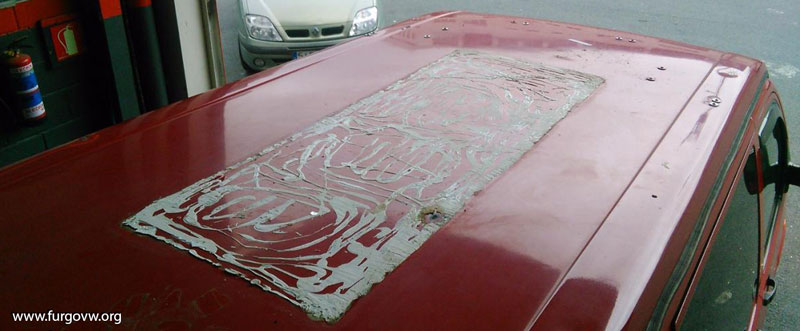
For obvious reasons, think carefully where you are going to place it before doing so. If once you put it on you regret it, removing so much glue will be quite an “experience”….. 😱
4. Attach the solar panel to the polycarbonate plate
Glue the solar panel to the polycarbonate plate in the same way you attached the sheet to the roof. There are solar panels that are self-adhesive. If this is your case, you will not need to use any more polyurethane adhesive.
To ensure that everything is well glued, protect the panel with cardboard and place a reasonable weight on the entire surface.
Advantages of not gluing a flexible solar panel directly to the roof
The benefits of gluing the flexible solar panel to the roof in the way we tell you are several, among them we could say the following:
- The chances of a hot spot are greatly decreased due to the ventilation provided by the polycarbonate sheet cells.
- Also due to the better ventilation, the temperature of the panel will not rise as much and the performance will improve.
- The panel will not be in direct contact with the roof, so the heat will not degrade the paint.
Disadvantages of not bonding a flexible solar panel directly to the roof
- Honestly the only drawback we can think of is that if you glue the panel onto the polycarbonate sheet you lose some of the thinness that we like so much about a flexible solar panel. The polycarbonate sheets are between 4 or 6 mm depending on the one you buy, so the plate would go from being between 2 and 4 mm thick to up to 8 or 10 mm.
As in everything, you will have to consider what is best for your installation. As we always say, for us the most important thing in this type of installation is to minimize risks and increase the safety and longevity of each of our elements. Therefore, this is our opinion if you want to take it into account for something 😅:
If we had chosen to install a flexible solar panel and not a rigid one without hesitation we would have put a polycarbonate sheet between the panel and the roof without a doubt. If you think there is any other better way to make this insulating layer, feel free to tell us about it, I’m sure many people will find it helpful.