If you want to achieve the long-awaited energy self-sufficiency one of the things you can do is to put a solar installation in your van or motorhome. It is possible that the whole issue of electricity intimidates you a little (or a lot 🤣) So, take a breath, fill yourself with positivism and patience and you will see, when you finish reading our post, that it is not as complicated as it may seem… Go for it!
1. Assess your needs and calculate your theoretical consumptions
If you have not already done so, you should calculate what electrical consumptions you plan to have in your van. Knowing these theoretical consumptions will allow you to properly size the elements of your installation. This task can be a bit tricky, so, to help you, we have brought you this electric consumption calculator for camper vans. Use it and find out the size of the components you will need to install to achieve energy self-sufficiency.
2. How much space do you have available on the roof for the solar panel?
This is another primary question you need to take into account, because, as in the rest of the van, also on the roof space is very limited. So, if your calculations have told you that you need a panel that really won’t fit on the roof of your van 😱 above all, don’t get frustrated! Measure the space you have available, look for the panel with the highest performance that will fit on the roof, and try to compensate with one of the other methods to charge the auxiliary battery that there is, for everything there is a solution 👍.
3. Choose the type of solar panel you are going to mount.
If you have followed the previous steps you will have already found out what theoretical power you need in your solar panel to have the autonomy you want and what are the maximum dimensions 📏 that the panel can have. Now, do not rush and rush out to buy the panel without having thought about which one is the most suitable for you. Thinking about your needs and the places you will travel can help you decide, but if you do not have much idea of what features you should pay attention to when choosing it, read our post What is the best solar panel for your camper van? and get out of doubt.
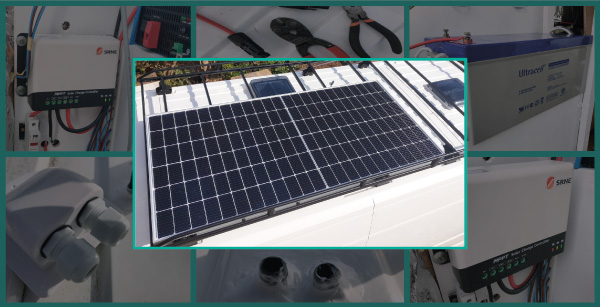
Finally, our choice was a PERC monocrystalline panel with 455W of power.
4. Do you already have the charge controller for your solar installation?
Do you already have the charge controller for your solar installation?
Another essential element for the installation of a solar panel is the charge regulator. A solar regulator is responsible for regulating or controlling both the charging and discharging of the battery in a solar installation. If you are still not sure which solar controller to buy for your camper van, you may be interested in reading our article. It is important that you choose the right controller for your installation, there are different types and with different charging intensities, so take your time and choose it well 😉.
We chose a MPPT 100V 30A solar controller for our van.
5. Calculate the minimum section of the cables of your solar installation.
You will have to do this step every time you are going to install an electrical component. You have to calculate what minimum section you need to put to feed it. To do this you have to take into account, among other things, the consumption of the device and the length of the cable.
Sizing the cables correctly is a very important task, because if any of the cables you use is too thin you run the risk of a voltage drop that prevents the device from working properly, that it overheats, that the insulating material degrades and even that a fire may start inside your van.
If you are not sure how to calculate the minimum section of a cable in the electrical installation in a van, read our article and get out of doubts!
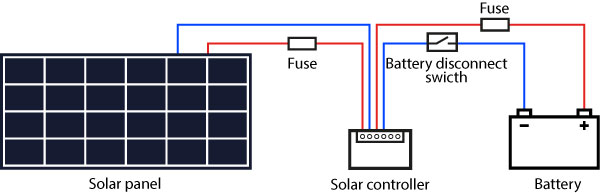
6. Design the wiring diagram of your solar installation
Now that you know the components you need, it is time to draw up a wiring diagram of your solar installation. In our opinion, it is something essential that will help you not to make mistakes when connecting all the elements of your installation
7. Make sure you have all the necessary components and material
We usually make a list of the material and tools that we are going to need before starting to do any installation. This prevents us, to some extent 😅, having to “run out” to the hardware store … And we already know every corner of the hardware store in our neighborhood from so many times we have had to go to get something that we have forgotten … So we leave you a small list of the material we use, in case it helps you:
Material for solar panel installation
- Monocrystalline solar panel PERC 24V 455W ✓
- MPPT Solar controller 30A (see on Amazon) ✓
- Gel battery 12V 316Ah Ultracell UCG-316-12 ✓
- 10 Gauge AWG cables (see on Amazon) ✓
- 8 Gauge AWG cables (ver en Amazon) ✓
- MC4 connectors (see on Amazon) ✓
- Double cable glands (see on Amazon) ✓
- G15A fuse + fuse holder (see at Amazon) ✓
- ANL 150A fuse + fuse holder (see on Amazon) ✓
- Battery disconnector 300A (see on Amazon) ✓
- Digital multimeter (see on Amazon) ✓
- Wire stripper pliers (see on Amazon) ✓
- Screwdriver set (see at Amazon) ✓
- Fish Tape (see on Amazon) ✓
- X2 Eye Terminal – Cable 25mm, eye 10mm (see on Amazon) ✓
- Heat Shrink Tubing (ver en Amazon) ✓
- Soldering Iron Kit (ver en Amazon) ✓
- Tubo corrugado de automoción o reforzado ✓
We put a roof rack on our van, so we attached the solar panel on top of the roof rack so it wouldn’t cast a shadow on it, so you may need to add mounting brackets to your shopping list to attach the panel to the roof (see on Amazon).
8. Place the solar panel in the appropriate location.
When it came to the assembly, the first thing we did was to place the solar panel. As we knew from the beginning that we wanted to install a roof rack on the roof of the van, we knew that the panel would have to go on the roof rack, as we did not want the bars to make shadows that would compromise the generation of electricity.
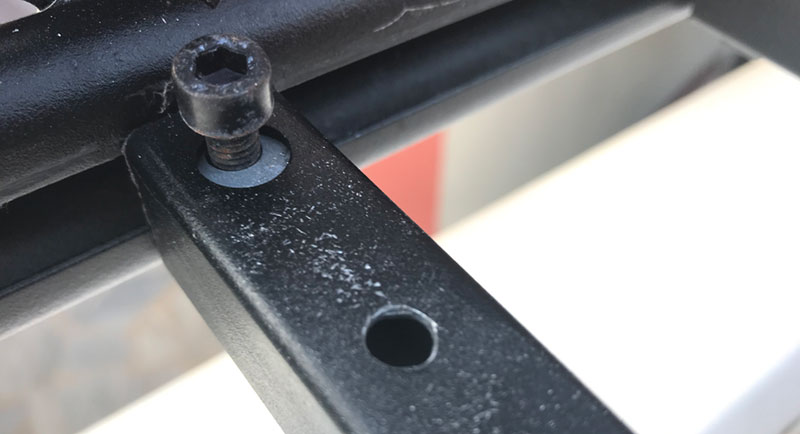
Both the characteristics of our panel, which measures 2112 x 1052 x 35mm and weighs about 25Kg, and the fact that we wanted to place it on the roof rack, made our assembly a bit “special” as the most common way is to fix the panel directly on the roof using mounting brackets to attach the panel to the roof (see on Amazon) that help to hold it.
In most of the sites we have visited and where we have requested information, they recommend gluing these brackets to the ceiling using a polyurethane adhesive such as sikaflex-221 (see on Amazon). Honestly, this way of fixing does not inspire us too much confidence, as we have read some cases in which the panel has literally flown off during driving. We suppose it is not the most normal thing, but we imagine what this could cause and we conclude that all caution is little. Therefore, if you are going to use this type of brackets, our humble recommendation is to also add some screws to fix them to the roof. We know that every single hole you make in the bodywork hurts, but we believe that, for safety’s sake, it is worth it.
How to install a flexible solar panel on a camper van?
Most people just glue the flex panel to the ceiling with some kind of polymer glue or special tape. Honestly, we do NOT like that idea at all. So, if your solar panel is flexible, we invite you to read our post with what we believe is the BEST way to install a flexible solar panel without risks, it will surely help you 👍.
Steps to fix our solar panel to the roof rack of the van
- We presented the solar panel on the roof rack and marked where we wanted to fix it.
- We measured the spacing of the roof rack bars and the distance the holes would be on each side of the metal frame the panel came with.
- We marked and drilled holes in each of the roof rack bars. Two on each bar (one for each side of the solar panel).
- We put stainless steel threaded rivets in each of the roof rack holes.

- We marked and drilled the holes in the solar panel frame. We gave them a little slack to save any mistakes we might have made.
- We presented the roof rack and crossed our fingers that the holes would match. It is well known that it is very important to cross your fingers… 🤣🤣
- We screwed the plate to the threaded rivets. It is important that the screws are hex head, to be able to screw them with a wrench, as there is not enough space to put a screwdriver.

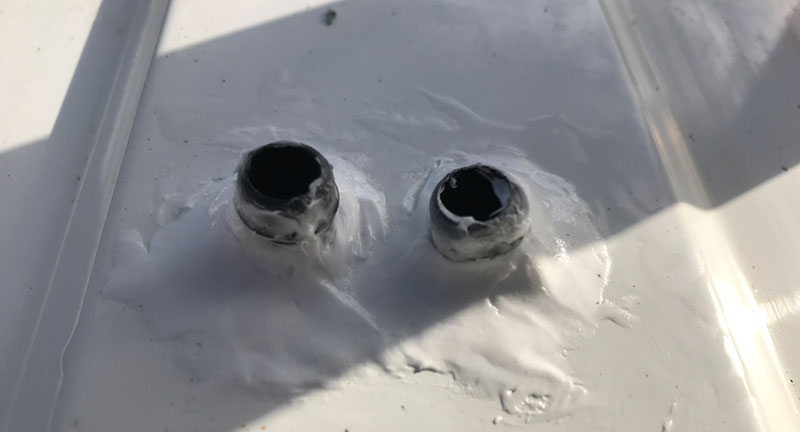
9. Place the wall bushings and the waterproof box.
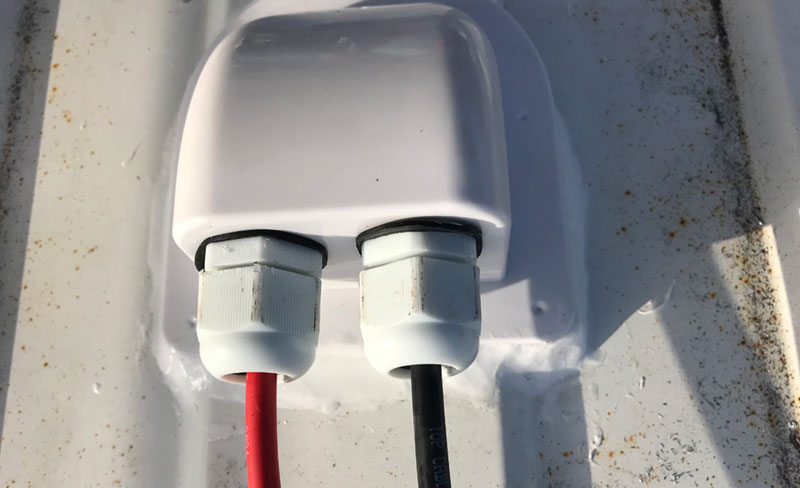
As our panel was so big and was going to be placed on the roof rack, we did this step before the previous one. To pass the cables from the panel to the inside of the van you have to make sure you make a watertight connection. For this there is a kind of plastic “box” with two watertight grommets for the cables and that is glued to the roof of the van and prevents any water leakage into the interior.
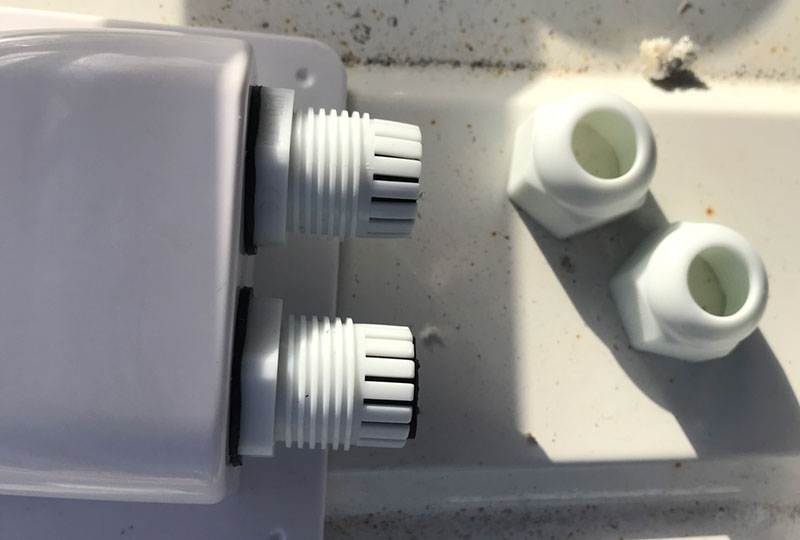
As you can see in the step by step images, its placement is very simple:
- Make the two holes in the roof of the vehicle through which you will pass the cables.
- We wanted to place some extra wall bushings in the roof plate to avoid that, with the vibrations and movements of driving, the metal could cause damage to the cables. Since we didn’t have a couple of grommets (see on Amazon) or rubber grommets (see on Amazon) to spare at the time, we got “creative” and used a drip sleeve we had on hand. We cut it in half and glued it to the ceiling with silicone.
- Pass the cables through the ceiling feedthroughs.
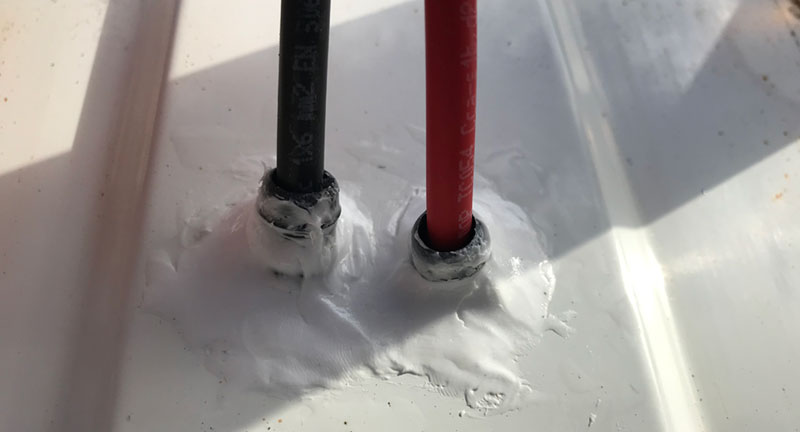
- Pass the wires through the wall bushings of the waterproof box. Be sure to tighten the threads securely so that the cable fits snugly and no water gets inside.
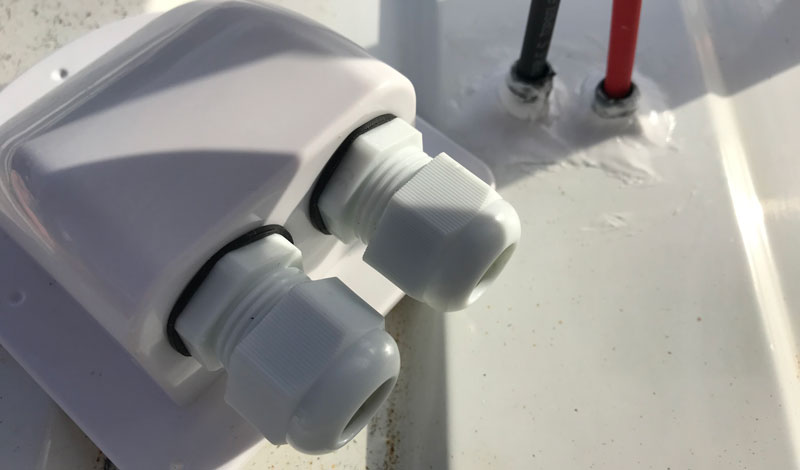
- Put outdoor silicone or polyurethane adhesive on the bottom edges of the box, glue it to the ceiling and seal the edges well to keep water out. Use your finger and soapy water to remove excess silicone.
10. Mount the MC4 connectors on the cables
To put the MC4 connectors on the cables that will go into the van you will need a female and a male terminal and a crimping tool (see on Amazon) or long nose pliers (see on Amazon) in case you don’t have a crimping tool.
These connectors are very easy to put on. Here is a video in which you can see it clearly.
11. Connecting the components of the solar installation
Once you have fixed the solar panel, the “most dreaded” moment will have arrived 🤣, it will be time to make the connections of all the components so that the solar installation starts generating energy.
To make the connections you will have to take into account the electrical circuit diagram that you designed in step 7. If you have not done it yet, we remind you how ours is.
When making the connections, always have the schematic of your installation at hand. It will be much easier for you to make the connections correctly.
The components of our solar installation are the following:
- Solar panel 24V 455W.
- MPPT solar controller 100V 30A with DC output.
- Gel battery 12V 316Ah.
- Fuse holder with 16A fuse: Installed in the positive fuse between the solar panel and the regulator.
- Fuse holder with ANL 300A fuse: Installed in the positive that goes between the battery and the regulator.
- Battery disconnector 300A: Installed in the negative that goes between the battery and the regulator.
Order of connection of the solar system components
The connection of the components is quite simple.
First, connect the fuses and the disconnector to the corresponding lines. Once you have done this, you only have to keep in mind that the order of connection of the components is VERY important. Make the following connections in the same order and you should have no problem:
- Positive from battery to regulator.
- Negative from battery to regulator.
- Positive from the solar panel to the regulator.
- Negative from solar panel to regulator.
Respect the order of connection, otherwise some of the components may be damaged, and you may even burn your solar controller.
Approximate budget to install a solar panel
INSTALLATION OF SOLAR PANEL
| PRICE | |
|---|---|
| PERC monocrystalline solar panel 24V 455W → | 190.19 $ ✓ |
| MPPT solar controller 100V 30A with DC output → | 148.93 $ ✓ |
| Ultracell UCG-316-12 12V 316Ah Gel Battery → | 451.72 $ ✓ |
| Wires 10 AWG → | 2.04 $/m ✓ |
| Wires 8 AWG → | 2.71 $/m ✓ |
| Solar panel plug connector MC4 → | 4.72 $ ✓ |
| Pasamuros estanco doble para cables → | 8.85 $ ✓ |
| Fuse GPV 15A → | 8.65 $ ✓ |
| Fuse holder 10×38 → | 5.43 $ ✓ |
| Fusible ANL 300A + fuse holder → | 54.86 $ ✓ |
| Battery disconnector 300A → | 26.22 $ ✓ |
| Digital multimeter → | 15.99 $ ✓ |
| Wire stripping pliers → | 15.99 $ ✓ |
| Cable grommets → | 4.99 $ ✓ |
| X2 Eye Terminal – Cable 25mm, eye 10mm → | 3.88 $ ✓ |
| Heat shrink tubing for cables → | 8.99 $ ✓ |
| Tin soldering iron kit → | 23.99 $ ✓ |
| Reinforced corrugated pipe 16mm 25m → | 6.49 $ ✓ |
| TOTAL | 984.64 $ |
Remember that every electrical installation is different. With this entry we try to give you a better understanding of how we calculate and dimension our electrical installation so that you can apply the concepts to yours.